Monday, October 31, 2011

A Last Minute Treat

This is cutting it to the wire.  But.  As I was sorting the laundry this morning, I had an idea.  I just had to squeak it in before the holiday was officially over.

Here you go.

Trick-or-Treat!


(I think the mummy is my favorite!)

(The witch needs a hat, but I couldn't figure out how to make her one.  
I tried paper and fabric and felt.  The mixed media just didn't look right.)

Sunday, October 30, 2011

Pumpkin Bundt Cake


 One of my dear friends gave me a recipe and the ingredients for the most delicious chocolate bundt cake a couple of years ago for my birthday.  I think we have made that cake several times a month ever since.  Honestly it's that good.  I decided to try a spin-off pumpkin version today.  It's not chocolate.  But it is good.  Very very good.


I mixed things up a little further, because I needed some little treats to take to a couple of my neighbors.  When I moved out of my parents house (long long ago) and shipped off to college, my Mom gave me her specialty cast iron bundt cake pan (I'm not sure why-I think she just wanted it to go to a good home.).  It looks kind of like a cupcake pan, but instead of cupcakes, it houses six small bundt cakes.  They are bigger than the ones you see today.  This pan is heavy duty.  I'd kind of forgotton about it.  Until I cleaned out my cupboard last week.  So, instead of making one large bundt cake, I made six small bundt cakes.  I still had quite a bit of batter left, so I made 12 mini bundt cakes too.  After all that, I still had batter left, so I scooped the rest of the batter into a regular cupcake pan.  I got 11 more cupcakes.

I dusted the small bundt cakes with powdered sugar.  I decided to fill the mini versions with whipped cream.  Think Hostess cupcake-pumpkin version.  I think it would also be delicious with a drizzle of icing.


Apparently this is a very versatile batter.

Just before I headed out to visit my friends, I carefully lowered three mini cakes in a jar and tied it with a bow.  They are a little hard to see in this picture, but you get the idea.  I hope they liked them!


Saturday, October 29, 2011

BOO!


We were "BOO"-ed the other day. You know what that is, right? Someone anonymously leaves a plate of goodies on your doorstep. Attached is a little poem explaining that you've been "BOO"-ed and then you in-turn deliver treats to two other unsuspecting homes in the neighborhood. It's been a Halloween tradition in our neighborhood for many many years now. So, I've been thinking all day today about what we should leave on the doorsteps tonight. I wanted to do a little something different this time around. I noticed this the other day on Pinterest. Click here for the original link.


I thought it might be fun to do something similar.  This is what I came up with:


I just made a simple bag topper out of card stock.  We are talking old school.  I didn't use anything fancy.  Just paper, scissors, and glue.  I stapled it to a lunch sack filled with this yummy treat that I came up with a few weeks back.  (You know, one of those recipes I was experimenting with for my cooking class).


Then I added this little tag:


Just print it, cut it out, and back it with some cute paper.  Don't forget to add a bit of ribbon.  Super cute!
Now, if you want to get really fancy, have your daughter "ring and run" wearing this little number:


Happy Owl-o-ween!

P.S.  Don't tell my neighbors it was me!


Looking for another BOO idea?  Click here.

Friday, October 28, 2011

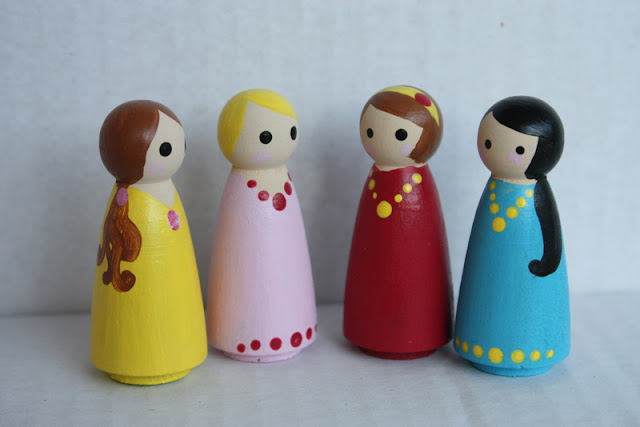
Peg Dolls


 I am a bit obsessed with peg dolls lately.  It all started with my budget (doesn't it always start there?) and several upcoming birthday parties.   You know what they say...necessity is the mother of invention.  We needed some little girl birthday gifts and we needed them fast and we had no moola.  Hence-peg dolls.  I think they turned out super cute.  I made three sets.  They are all a bit different from each other.  Pretty much all you need are some wooden pegs that you can find at any craft store for a couple of bucks and some acrylic paint. And some brushes.  Oh yeah, and some imagination.


 I've got big plans for more peg dolls in the future.

Thursday, October 27, 2011

Pumpkin Filled Cannoli Cones


 Let's get our cannoli on!  This is not a traditional cannoli recipe, but man is it yummy!  I used my new waffle cone maker to make the shells.  I just followed the recipe in the pamphlet that came with the machine.


 You can also use store bought sugar cones.  I filled it with a traditional ricotta filling, first.  (Something similar to this)  Then I tried a pumpkin version.  Aren't they cute?

So, first mix up your recipe for waffle cones.  Instead of making a large cone, I just added about a teaspoon of dough to the middle of the waffle cone maker.  A small cookie scoop works really well for this.


Close the lid and time them for about 1 minute and twenty seconds.  The timing light on the machine didn't really work that well, because I didn't use the proper amount of dough.  So, count in your head or use a separate timer.  When the shell is a golden shade of brown, gently remove it from the iron.


Place it on a clean and dry kitchen towel.  I used the end of a large wooden spoon to wrap the shell around.  Then press down on the end for a few seconds until it hardens in place. One batch of dough made about 25 cannoli shells.  It takes about half an hour to make them all.  You can do these in advance, just store in an air-tight container until you are ready to use.

Next up, let's make our filling.  I got the inspiration for these from a recipe by Lauren's Latest on Tasty Kitchen.  I altered the filling a little, because I wanted it to be a bit more substantial.


Scoop the filling into a piping bag (or a ziploc bag with the end cut off).  I used a large star tip.  It just takes a little squeeze to fill them up.  Dip the ends in mini chocolate chips or chopped walnuts and dust with powdered sugar.

These really are delicious and easy!  And you get to use a piping bag--bonus!

Wednesday, October 26, 2011

Pumpkin Cheesecake Bites

Pumpkin cheesecakes bites make me happy.  Really really happy.  I developed this recipe for a little baking class that I was asked to teach.  They are the perfect size to eat two or three (or ten or twelve) and not feel the least bit guilty.

Pumpkin Cheesecake Bites--let's get to it!

You are going to need a box of mini vanilla wafers, canned pumpkin, and some cream cheese.  Other than that, you should have most of this stuff already in your pantry.

Preheat your oven and line your pan with cupcake papers.  Next, drop a mini wafer in the bottom of each cup.  Be sure to place them flat side down.  In a large mixing bowl, cream your cheese and sugar together.  Then add the eggs, pumpkin, vanilla, and spices.  That's all there is to it.  I like to use a small cookie scoop to fill the cups.  You want it to be just shy of full.  One scoop per cup.  Bake at 350 degrees for about 12 minutes.
Remove the pan from the oven.  Then carefully transfer each cheesecake to a cooling rack.  Now you can fill your pan one more time.  This recipe makes about 48 bites.  Be sure to refrigerate your little cheesecakes until you are ready to serve.  I like to garnish mine with whipped cream.

I highly recommend that you make these--like right now!  You won't be sorry.

Like a Pretty Petunia

My five year old daughter goes around the house all the time saying "like a pretty petunia" in the sweetest little voice.  I have no idea where she picked up this phrase.  It makes me smile every time.
Related Posts Plugin for WordPress, Blogger...