Showing posts with label Chinese New Year. Show all posts

Tuesday, February 12, 2013

Egg Rolls

Our Chinese New Year party was how shall we say...not quite what we had planned.  The influenza invaded our house over the weekend.  So, we had to postpone our grandiose plans for Sunday evening.  By last night we were doing a little better but still not great.  The problem is that most of the groceries that I had purchased for this party were perishable and needed to be used sooner as opposed to later.  We ended up scaling down our menu considerably.  We scaled down our guest list even more.  Pretty much just the family attended with a few exceptions.  We had a great time nonetheless.  And we definitely made egg rolls.


Egg rolls are the quintessential element in my Chinese dining experience.  I love them.  I could go to a restaurant and just order egg rolls and be completely content.  So, no Chinese New Year party is complete without egg rolls.  This recipe is delicious.  I won't lie to you though...it is a time commitment.  Totally worth the effort and not difficult at all.

Let's get to it, shall we? 

You will need to buy some fresh vegetables from your favorite produce place.  You will need celery, a medium sized onion, mushrooms (8 oz package), green onions, bean sprouts (1 pound), and napa cabbage.


 You will also want to pick up some ground pork sausage, egg roll wrappers, and some water chestnuts.  The first thing we need to do is to prepare our vegetables.  Separate your cabbage leaves and rinse them well.  Pat dry with paper towels.  Slice into thin slivers and then chop them into one inch lengths.  You will need 1/2 pound of sliced cabbage.
 
Wash two celery stalks and slice thinly on the diagonal.  Wash and slice two green onions.  While you are at it, chop up the yellow onion.  I only used about half of it.  Put the celery and onions together in a small bowl and set it aside.

Chop up the chestnuts.  Rinse the bean sprouts and wash and slice the mushrooms.  Place them in a bowl and set aside.

Crumble and cook the pork sausage in your wok.  When it is completely cooked, set it aside in a bowl and wipe out your wok.


There's just one more thing you need to do before we start to bring all of this goodness together.  You need to make the gravy.  Measure out 4 tablespoons of water, 1/2 teaspoon of soy sauce, 2 teaspoons of oyster sauce, and 1 tablespoon of corn starch in a small bowl and whisk to dissolve.  Set aside.

Now for the fun part.  Heat your wok over medium-high to high heat.  Add a couple tablespoons of oil for stir-frying.  When the oil is ready add the celery and onions and stir-fry.  Add pinch of salt and sugar if desired.  Remove from the wok and place in a large bowl.


Clean the wok and stir-fry the mushrooms, bean sprouts, and water chestnuts.  Add salt/sugar if desired.  Remove from wok.


Stir fry the napa cabbage.  Cover the wok and cook for about 1 minute.  Add all of the ingredients back into the wok and gently mix.  Push the vegetables up against the sides of the wok.  Add the gravy in the well that you have created.  Cook until thickened.  Mix well.  Set the filling aside and allow to cool before wrapping.

 Before you assemble your egg rolls, drain the vegetable/pork mixture well.  Otherwise you will end up with very soggy egg rolls.  I like to put my mixture into a colander over a bowl.


At this point everyone was hungry and things were getting crazy in the kitchen.  So I neglected to take photos of assembling the egg rolls.  I always follow the instructions on the egg roll wrapper package.  Orient your wrapper so the point of the square is facing you.  Place a heaping tablespoon of mixture in the center of the egg roll.   Fold the bottom corner up over the mixture.  Fold each side corner towards the center.  Using your finger, put a little bit of "glue" (1 tablespoon water mixed with 2 teaspoons of corn starch) on the top corner (this will help to seal it all up).  Then roll it closed and press to seal.

Deep fry your egg rolls until golden brown.  Drain on paper towels.  I like to line my serving platter with the extra cabbage slivers.  Serve warm with sweet and sour sauce.


 Happy New Year!


Friday, February 8, 2013

Happy New Year!


Chinese New Year!  It's the year of the snake  and it starts this weekend.  Are you ready for a big party?  We have a big get together every year in honor of the spring festival.  But even more to honor our youngest daughter who hails from China.  We dig into heaping piles of Chinese food, make crafts, throw lots of confetti, and make lots of noise.  It promises to be a great day! 

And this year I promise to share my egg roll recipe with y'all.  So don't go too far. 

In the mean time...here are some past posts to get you in the mood.

Lucky Dragon Eggs.  These were a hoot last year.  Not traditional, but fun nonetheless.  The kids were cracking them on their heads and having a great time.  I think they could easily be switched over to lucky snake eggs.

CNY Fortune Tellers.  Again, not traditional.  But totally fun.  All you need is some paper and a printer.  I've done all of the hard work for you!

Make A Big Noise.  This was originally posted as a New Year's Eve idea.  But it is easily adapted to the Chinese New Year.  In fact, last year we used red balloons and threaded them together to make a dragon.  Then my daughter painted a cardboard dragon face that we attached to the front of our dragon.  It was awesome.  We loved popping all of the balloons and showering ourselves in confetti..

Friday, January 13, 2012

Lucky Dragon Eggs


 If you read this post, you know that my family is anxiously awaiting the arrival of the new lunar year.  Chinese New Year is the most important traditional Chinese holiday.  It is also known as the Spring Festival.  The festival will begin on the 23rd of January this year and last for fifteen days, ending with the Lantern Festival.  "Twenty Twelve" is the year of the dragon.  


In honor of the dragon, we decided to make these lucky dragon eggs to open as we celebrate the new year.  The Chinese associate eggs with long life and happiness.  They consider eggs to be very lucky.  It is often incorporated into their various celebrations.  Although, probably not quite like this.  


First you need to buy some eggs.  We decided to make six dragon eggs of luck.  Wash and dry them well.  Now you want to punch a small hole on each end of the egg.  I found that a thumbtack and a small hammer or mallet works well for this.  Keep a light hand or things could go terribly wrong.  Once you have a small hole you can enlarge it a bit with a toothpick.  

I found it helpful at this point to stab a toothpick through the hole into the heart of the egg.  (That sounds a bit harsh, doesn't it?)   This will puncture the yolk and make it much easier to get the contents of the egg---shall we say, out?  


Now for the fun part.  You will need a small bowl.  Wipe the outside of the egg--you want it to be clean.  Put the egg to your mouth and blow blow blow!  (Just a little word of advice.  Do not under any circumstances suck in!)  My daughter loved this part--you just can't help but giggle.  The eggy part of the egg should now be in the bowl and you should be left with just the shell.


Rinse the egg under running water.  You want some water to get inside the egg.  Shake it up to clean out your shell.  Then you may need to blow again to get the water all out.  


Repeat with the remaining eggs. Now you need to let your eggs sit and dry overnight.  
Phase One Complete.


Once you are sure your eggs are dry, you are ready for Phase Two.  

How exactly do you tell a dragon egg from a normal old chicken egg?  Well, all dragon eggs have a small dragon symbol on the outside!  (I totally just made that up.  But it sounds right to me.)  You will want to print this little dragon symbol out to make sure your eggs are properly identified.

All you need to do now is modpodge your dragon symbol onto your egg.  I was out of Mod Podge, so I just diluted some Elmer's glue with a little bit of water.  Put some glue on your egg and put your dragon symbol over the top.  Then I brushed some more glue over the top of the symbol.  You will probably need to use your finger to smooth it all out.  


While your glue is drying,  you need to decide what you want to put into your dragon eggs.  There are many options.  You could fill them with confetti.  If you choose to go this route, you may want to enlarge one of the holes to make it easier to get your confetti in.  You could write a fortune on a strip of paper, roll it up and stick it into the hole.  Or you could put a dollar bill inside.  Of course, you could also do any combination of the three.  We chose to do fortunes and make one of the eggs extra lucky by putting some money into it.  


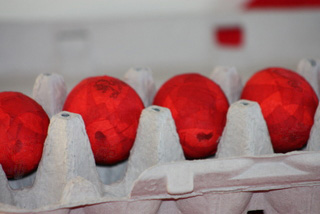
Now you want to seal up your hole and decorate your egg.  You will need some red tissue paper for this part.  (red paper napkins would also work)  Red is definitely the color of choice for Chinese New Year.  The Chinese believe that red scares away evil spirits and bad fortune.  Cut your paper into small squares.  ModPodge or glue red squares of paper over the holes in your egg.


We are almost done, let's get this whole egg thing wrapped up, shall we?    Modpodge layers of the red paper squares over the egg until the shell is completely covered. 


 The dragon symbol should show through the tissue paper.  Let your eggs dry completely.  Set them aside until New Year's Eve. 
Phase Two Complete.


At the appropriate time  crack open your lucky dragon eggs and see what the new year holds in store!  These little guys are pretty solid.  Hopefully we will be able to get them to crack.  We may have to use that little hammer!
*****
Just to be clear, this is not a traditional way of celebrating Chinese New Year.  
This is just us having some fun!


Monday, January 9, 2012

[CNY] Fortune Teller

Our family has a big holiday coming up.  No it is not Civil Rights Day.  Valentine's Day?  Nope.  Grandpa's birthday?  Yes, but that is not what I am referring to.

Give up?

Chinese New Year!!  This has become a big day for our family since we adopted our youngest daughter from China four years ago.  We love to decorate with Chinese lanterns, and make piles and piles of Chinese food.  We love to make a lot of noise and throw a lot of confetti.  And we love to share this day with friends and family.

Gong Xi Fa Cai is how you say "Happy New Year" in Mandarin Chinese.  The Cantonese version is "Gung Hay Fat Choy".  This year the first day of the Spring Festival falls on January 23rd.  Mark your calendars!  And get ready to start a new family tradition.  I promise that it will be loads of fun.  To get you in the mood, I have made a paper fortune teller for you.  I filled mine with zodiac animals and chinese fortune cookie fortunes.  These are not traditional, but the kids will love them.  You may be more familiar with the term "Cootie Catcher".   Most kids know how to fold them and use them.  If not, you may find a tutorial here.


This is how you play:

*Print and fold the paper fortune teller as described in the tutorial.

*You hold the fortune teller by putting the thumb and index finger from each hand into the "cups" on the bottom.

*Now the person seeking a fortune chooses one of the words on the outside.  The teller then opens and closes the peaks while spelling whichever word was chosen.  For example, if I chose the word "Gong", the teller would open the peaks by moving their thumbs and index fingers apart first in a north and south position (for the letter "g")  then in an east and west position (for the letter "o"), North and south ("n").  And  east and west ("g").  Is that as clear as mud?

*Now the person seeking a fortune chooses one of the zodiac animals.

*The teller once again spells the name of the animal while moving the peaks.

*Choose another animal.

*The teller then lifts the flap and reads the fortune underneath.

It's just that simple.  I guarantee hours of entertainment!


You can print the paper fortune teller by clicking on the appropriate buttons below.


I'm linking up with:
Related Posts Plugin for WordPress, Blogger...