Showing posts with label baby. Show all posts
Tuesday, March 20, 2012
[baby edition] batik baby blanket part two
If you missed part one, you will want to click here to bring yourself up to speed. Gather your supplies and stamp your wax patterns onto your fabric. Once your fabric is waxed with your chosen design, you are ready to dye it.
Just to remind you, for this part of the project, you will need:
RIT liquid dye
water
non-iodized salt
a non-reactive bucket or large old bowl
a stirring stick
rubber gloves
old towels and rags
iron and ironing board
paper towels or kraft papers
I purchased a bottle of RIT liquid dye in petal pink. I only needed a small bucket of dye for this project. Pour eight cups of hot water into your bucket. Add 1/4 cup dye to your water.
Now add 1/4 cup of non-iodized salt and stir well.
Submerse your fabric into the dye mixture.
Allow it to set until it becomes the color you desire. I waited ten to fifteen minutes. The longer it sits in the dye bath, the darker and brighter the color.
Carefully remove the fabric and blot it with some old rags. Hang the fabric to dry. Once your fabric is dry, you will want to iron it, to remove the wax. Place a clean old rag on your ironing board. Place paper towels or kraft paper on top of the rag. Place your fabric on top of the paper. Put another paper towel or piece of kraft paper on top of your fabric. Iron away! You want to use a hot dry iron (no steam). I set my iron on the "cotton" setting. The wax will melt and be absorbed by the paper. Change out your paper towels as necessary. Continue ironing until all of the wax is removed from your fabric.
Iron the entire piece of fabric really well to set the dye. Hand wash your fabric with detergent to remove any traces of beeswax.
Now you are ready to finish sewing your sweet baby blanket. Square up the sides with a rotary cutter and turn the edges. Buzz around the edges with your sewing machine to hem it. Tie it with a cute bow and you are all set to go!
I can't wait to see this blanket swaddled around a little new born baby!
Saturday, March 17, 2012
[baby edition] Batik Baby Blanket Part One
A friend of mine just welcomed home a sweet baby this week. And this time it is a girl! Is it just me, or does it seem like all of the new babies lately have been of the male gender? Boys are super fun. But I have definitely been in the mood for some girly girl. I love making gifts for babies!
Have you noticed the gauzy lightweight cotton blankets that are all the rage right now? They are big and wonderful for swaddling new little ones. And perfect for spring and summer! But they are a little bit pricey. So, I decided to make my own. The fabric isn't that expensive, especially if you have a coupon. You could probably pick up what you need for between five to seven dollars. Some of the blankets that I have seen at the stores have cute little images printed on them. Hmm. That's a little harder without some special equipment. After a little bit of research, I decided this would be the perfect time to experiment with batik! And I did. And oh-my-goodness it is so much fun! I might just have a new addiction.
What the heck is batik, you ask? It is the traditional fabric of Indonesia. If you want to know all of the amazing details, click here. Basically it is a technique for dying fabric that uses wax as a dye resistant. Huh? You apply hot wax to your fabric in whatever design you want. When you place your fabric in a vat of dye, the places on the fabric that have been "waxed" resist the dye. It can be very complicated and involve multiple dyes. Or it can be very simple. I opted for simple. I almost always opt for simple. Babies don't need much to make them happy.
For this project you will need:
beeswax (you can use paraffin, but it will not produce the clean lines that beeswax offers)
double boiler
cookie cutters or other simple shapes to dip into the wax
fabric (washed, dried, and ironed)
iron
dye (I used RIT liquid dye)
non-iodized salt
bucket or non-reactive bowl
non-reactive stirring stick
paper towels, old rags, kraft paper or the like
Step One: Wash and dry your fabric before you do anything else. I bought a yard and a half of fabric that was 45 inches wide. By the time I trim it up and hem it, I should have a square blanket. You need to remove any starch or chemicals that would prevent the dye from setting. You will probably want to iron your fabric as well.
Step Two: Chop your beeswax into smallish pieces and place it in the top of a double boiler. I decided that I didn't want to put the wax into my nice pan. So I used a clean tuna fish can for my wax and placed it into a small pan of water. It doesn't take much wax to batik a baby blanket. I used maybe a two inch cube of wax for the whole thing. Heat and melt your wax. I used medium heat until it was melted and then turned the heat way down. Be careful, you don't want to heat your wax all fast and furious-like. And don't leave it unattended. There is a flash point where the wax will ignite.
Step Three: Line your work surface with paper to prevent staining and to make wax clean-up easier. I used some of paper from my daughter's art easel. Place your fabric over the top.
Step Four: Apply the hot wax to your fabric. I used flower shaped cookie cutters. Place the cutter into the hot wax for at least thirty seconds to warm it up. I attached a clothespin to protect my fingers from getting burned. Those metal cookie cutters get HOT! Pick up your cutter with the clothespin and allow the excess wax to drip off for a second. Then place your cutter onto your fabric and allow the wax to soak in and then remove. This just takes a few seconds. It's very much like rubber stamping. You want the wax to be translucent on your fabric. If it is opaque, your wax isn't warm enough. It hasn't completely absorbed into the fabric. You may get some drips or imperfect stamps onto your fabric. I think it adds to the charm!
Step Five: Repeat. Repeat. Repeat. I kept dipping and stamping until I had the finished design that I was wanting. After every five or six stamps, I needed to return my pan to the stove and reheat my wax.
I used a frosting piping tip for the center of my flowers. I also thought it would be cute to use it to add some random "polka dots" for whimsy's sake. Just be warned, the wax is really hard to clean off of small cutters and piping tips. They may or may not be usable for their original purposes when you are finished. Look around the house, you will find all kinds of things that make interesting patterns. Wooden blocks, wooden spools, metal rings...they all work great!
Click here for part two--wherein we actually dye our sweet little blanket!
Wednesday, January 25, 2012
[baby edition] burp cloths
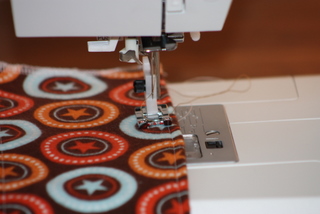
Guess what?? It's hard to believe, but I came into a little extra cash. That never happens. Ever. But for some reason, the stars have aligned. I figured I'd better spend it and fast...before it just goes up in smoke. How about a new sewing machine? Yes, I think so.
I've had my old sewing machine for almost eighteen years. It has not been working well. It was time for a new one. After much deliberation, I bought a Husqvarna (which is a fancy way of saying Viking) machine.
I am not going to lie to you--my new machine is SO MUCH FUN!!
That might explain the late blog posts. I've been playing.
In other news. My second grand-nephew was born yesterday. Finally! He took his sweet time coming into the world. But I think he will prove to be worth the wait. In honor of this new little guy I decided to make some burp cloths. I found this idea on the internet a while back and I wanted to give it a try. When I was a mother of newborn babies, I preferred cloth diapers over every other burp cloth out there. They are just so absorbant and handy. So this was a perfect marriage of cute and practical.
You will need:
pre-folded cloth diapers (I bought mine at Target. It came in a pack of 10)
cute flannel fabric (you can get two burp cloths out of a fat quarter)
matching thread
scissors
sewing machine
straight pins
I followed PetiteLemon's basic tutorial, but changed it up a bit to make it my own.
Be sure to pre-wash your diapers and your fabric. I cut my flannel fabric strips five inches in width and nineteen inches long. I serged the long sides of each strip. You certainly wouldn't have to, because the next step is to press those raw edges into the center. I folded the edges of the long sides over about half an inch and pressed them into place. Then I used my new handy dandy sewing machine to stitch the fabric strips onto the cloth diaper. I used straight pins to hold the fabric in place while I sewed. This proved to be a great opportunity to play with all of the different stitches that my new machine offers.
The original instructions say to fold and stitch the short ends under. But, as I looked at those silly cloth diapers and realized that the edges are just serged anyway, I decided on a short cut. I just serged the ends of those diapers over again and in the process I cut and serged the fabric strips as well. It made for less bulk and it was fast. And I don't think it diminishes the cuteness at all.
So, there you have it---burp cloths for the new babies in your life.
Wednesday, January 4, 2012
[Baby Edition] Make it All Better Basket
Guess what?? As of last night, I am a great aunt! It's so exciting. Now I am as cool as my friend Robyn, who has been touting her great aunt status for quite some time. (Well, truth be told--I will never be as cool as my good friend Robyn.) Anyway, he is the cutest little thing! And the best part, is that I am going to have another cute little grand nephew coming in just a matter of days! Double joy!
Do you think it makes me old? To be a great aunt? I have been thinking on this for a while. I have decided that it says nothing about my age at all. It just means that my brother is getting old! My kids are far far far from the ages of giving me grandchildren. At least that is what I keep telling myself.
Well, all of these darling babies have put me in the mood to make baby gifts. So, let's get at it. Shall we?
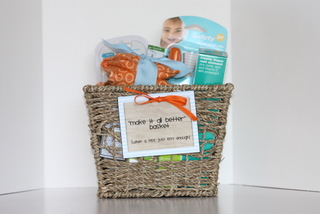
"Make it All Better" Basket--for when a kiss just isn't enough.
I remember those first moments of being a new Mom. It was all so overwhelming and wonderful and magical. Absolutely perfect. If only the perfect could last. Unfortunately, we can't cuddle and snuggle those little guys forever. Eventually (and all too soon) they leave their Momma's lap and start banging their noggins on tables and falling off of their bikes. There will be sleepless nights of fevers and tummy aches. There will be lots and lots of bumps and bruises and broken bones. But, at least now these new mommies can be prepared for the inevitable.
Here's what I put in mine:
Sesame Street band-aids
digital thermometer
medicine dispensers
pedialyte for dehydration due to vomiting and diarrhea
diaper rash ointment
mylicon drops for baby gas
saline solution for runny noses
tylenol suspension drops for fevers
orajel for teething pain
I whipped up a quick little heating pad following this tutorial by The Green Wife. I scaled it down considerably to make it kid sized. I folded it up and wrapped it with a bow. When you are ready to use it, just unwrap and pop it in the microwave for a few seconds. These little heating pads are great for soothing all kinds of hurts!
Congratulations ladies! And I can't wait to hug and kiss those cute little guys!
Do you think it makes me old? To be a great aunt? I have been thinking on this for a while. I have decided that it says nothing about my age at all. It just means that my brother is getting old! My kids are far far far from the ages of giving me grandchildren. At least that is what I keep telling myself.
Well, all of these darling babies have put me in the mood to make baby gifts. So, let's get at it. Shall we?
"Make it All Better" Basket--for when a kiss just isn't enough.
I remember those first moments of being a new Mom. It was all so overwhelming and wonderful and magical. Absolutely perfect. If only the perfect could last. Unfortunately, we can't cuddle and snuggle those little guys forever. Eventually (and all too soon) they leave their Momma's lap and start banging their noggins on tables and falling off of their bikes. There will be sleepless nights of fevers and tummy aches. There will be lots and lots of bumps and bruises and broken bones. But, at least now these new mommies can be prepared for the inevitable.
Here's what I put in mine:
Sesame Street band-aids
digital thermometer
medicine dispensers
pedialyte for dehydration due to vomiting and diarrhea
diaper rash ointment
mylicon drops for baby gas
saline solution for runny noses
tylenol suspension drops for fevers
orajel for teething pain
I whipped up a quick little heating pad following this tutorial by The Green Wife. I scaled it down considerably to make it kid sized. I folded it up and wrapped it with a bow. When you are ready to use it, just unwrap and pop it in the microwave for a few seconds. These little heating pads are great for soothing all kinds of hurts!
Congratulations ladies! And I can't wait to hug and kiss those cute little guys!
*****
I'm linking up with:
Subscribe to:
Posts (Atom)