Showing posts with label decor. Show all posts

Monday, April 22, 2013

[teacher appreciation] Door Decoration


We have a tradition in our elementary school of decorating the teachers' classroom doors for teacher appreciation week.  I was asked to decorate my daughter's Kindergarten door for her teacher.  I thought about it for a long time.  Her teacher is amazing!  She loves to read and has instilled this love in her students.  I wanted to do something that involved children's literature.  I thought it might be fun to use an illustration from a children's book to show our teacher how much we appreciate her.

We love Mo Willems at our house.  If you aren't familiar with his works, run to your nearest library and check out a book or two or three or ten!  They are delightful!  My daughter is especially fond of the Elephant & Piggie Books.  The last time we went to the library we really did check out about a dozen of them.  Our all time favorite is There Is a Bird On Your Head .  But I found a fun illustration in his book I Am Invited To A Party that I wanted to use for our teacher's door decoration.

First thing you need to do is to acquire the book or the illustration that you want to use.  I scanned the page into my computer.  Then I used our projector to enlarge the image.

Now you need to trace the image onto a large piece of paper or posterboard.  I just lightly traced the image with a pencil.

Once you have captured the basic image, you can trace it with a black marker.  Have you tried the new Sharpies with a brush tip??  I am in love!  The funnest marker I have ever used.  Not kidding.  Outline the image in black and then color as desired.  I used mostly markers to bring my image to life.  You could also use crayons, pencils, or chalk.  I actually did use chalk to color most of Elephant's body.  It was just too much surface area to color with the marker.
 

Now all you have to do is cut out your image with a pair of scissors.

I had pre-measured the teacher's door which proved to be very handy.  My daughter's teacher always leaves her door open.  So, I had to work around the push bar.  Which was kind of a pain.  The other side of the door probably would have been easier.  I grabbed some bulletin board paper from the teachers' workroom while I was at the school earlier in the week.  You know what I mean, right?  The big rolls of colored paper?  I pulled out and cut a little more than I needed.  When I got home I measured out the roll of paper and cut it to the exact size.

If you want to write a fun phrase about your teacher, you will need to cut out some letters.  Or you could just draw or paint them right onto your paper.  I chose to cut some out.  And I did it old school baby!  I used a large stencil set and hand cut each letter.


I wanted to assemble everything on-site.  So I hauled all of my supplies to the school.  I taped the colored roll paper to the door.  Then I attached my images and my letters.


There you have it!  You knew I would add some bunting, right?  I think it turned out pretty fun.

*****

As I was cutting out the letters, my six year old asked me what I was doing.  I told her what I was going to write on the paper..."Mrs. Crockett makes learning fun!"  Her response?  "She really really does!"

Thanks to all the great teachers out there!  We appreciate you!

Thursday, April 18, 2013

[Party] Where in the World?


Yesterday was kind of a big deal for our family.  My 18 year old son turned in his application to serve an LDS mission a few weeks ago.  As a missionary he would be assigned to serve for two years.  Missionaries are sent all over the world and speak almost every language imaginable.  We received word from the post office that his assignment had arrived yesterday morning.  We were so excited and anxious to see where he would be going!  He wanted to wait until evening to open his letter so that many of his friends and family could be there with him.  Twelve hours is a long time to wait.  Truth be told, I've been waiting for this day for over eighteen years!!  I could hardly stand it.  We decided to make a party of the whole thing.  It gave me something to keep me busy all day.

So, I set to work.  We went with a map theme.  It seemed like the logical choice since that was the big question of the evening...where in the world would he be going??


You can't have a party without garland, right?  I love me some garland.  I knew that I wanted to make it out of maps.  But where was I going to find enough maps for cheap to finish the job.  Then it came to me...a stoke of genius really.  We had an old road atlas collecting dust on the shelf.  I set to work removing the pages and cutting them into triangles.  It was quick work.  Before I finished watching an episode of Downton Abbey, I had a huge pile of triangles.  Then I punched them and strung them on some yarn and hung them all over our front room.


I hadn't even begun to exhaust my map source.  So, I made little cupcake flags.  I just cut strips and glued them to a toothpick.  My strips were about three inches long and one inch wide.  Fold them around a toothpick and glue in place.  Cut a notch in the end if you want.  We made these cute little jars of yumminess to serve for dessert.  I did a strawberry shortcake version and a chocolate cake version.  They were fast and I could make them ahead of time.  I didn't want to have to be tied to the kitchen, once our guests started arriving.  They were delicious! 


I decided to just use some full pages of the atlas as a table runner and put a globe in the middle for a centerpiece.


Last but not least, we made a guessing jar.


We had each of our guests venture a guess as to where they thought he would be going.  They wrote their name and place on a strip of paper and put it in the jar.  People were guessing Russia, Brazil, Taiwan, China, France, Kansas, Michigan, Africa, Spain, Washington state, Oregon, Paraguay, etc etc.  When it as all said and done, there was only one person who guessed correctly!

It was a super fun evening.  I'm so proud of my boy!  Do you want to know where he will be going?

California!

Have you seen missionaries in your neighborhood?  Be sure to say "Hi"...they are some of the most outstanding young people you will ever meet!

Sunday, May 6, 2012

[Prom Week] Lest We Forget the Boys


I was at the grocery store and found some Breathsavers on clearance for ...50 cents!  Perfect.  I'll take seven.  I wrapped them in brown kraft paper and glued on a little yellow "button".  Finished it off by stamping p-r-o-m in black ink.  Simple and fast.  That's how I roll.

**We had the big party last night.  If the smiles and laughter and really full bellies are any indication, I'd call it a huge success!  I will post more of the details as soon as I sort through the hundreds of photos that were taken.

Wednesday, May 2, 2012

[Prom Week] Bunting


So, this weekend is our high school prom.  My son asked his date about five or six weeks ago.  We have been making plans ever since.  I can not believe how expensive prom can be.  It's craze-balls.  By the time you buy your dance tickets, rent the tuxedo, buy a corsage, and pay for dinner you are easily in the $200 range.  That's a lot of money for a teenager who hasn't had a job since last summer.  Believe me, those funds were exhausted long ago.  And that's a lot of money for Mom to fork over.  Time to get creative.


Color me crazy, but I volunteered to host seven couples for a formal dinner.  Each young man is donating $25 to the cause (which is quite a bargain if you ask me).  We were able to secure a wonderful location for free.  Some friends are letting us borrow a couple of round tables and enough chairs for everyone.  My niece, who is an amazing pianist, has graciously agreed to play the grand piano for us while they dine.  Her husband is dusting off his tuxedo and has agreed to be the waiter.  I have been working on the menu and the table decor.  I still want them to have the experience of a fancy restaurant without the cost.  So, I am trying to recreate that atmosphere as best I can.  I plan on using my fine china and crystal.  I have a couple of long white table cloths and some natural linen table toppers in my collection (leftover from one of my brother's weddings I think).  I decided to accent them with bits and pieces of yellow.  Doesn't yellow just scream "spring"?  It's such a happy color.

And it has all kind of grown from there.

I thought I'd bring you along on my adventures this week as I get everything ready.

First up.  Decorations.  On the cheap.


I purchased some card stock at Hobby Lobby on sale yesterday and made some paper bunting.  I was able to make six long strands for under seven dollars.  I apologize for the really dark pictures.  I could not get the lighting to work.  I used  craft brown, yellow, champagne, white, and polka dot papers.  I was originally going to cut circles, because I love circle garlands.  There is just something about them that I am drawn to.  But in the end, I chose triangles.  For two reasons.  They are very easy to cut and there is very little waste.  I cut the triangles four inches high and three inches across the base.  Then I punched two holes to string them and ran a piece of white yarn through.  Simple.  I think they turned out really cute.


Last night I had the idea to make some little favor bags for the girls.  I decided to incorporate the bunting into the favor.  I used a fine tip black sharpie to draw a line onto some muslin bags that I already had in my stash.  Then I appliqued some tiny fabric triangles onto the line to make the "bunting".  I may stamp their names along the bottom or maybe just put "prom 2012".  We'll see.  I plan on filling these tiny bags with lemon drops.


Bunting.  So fun.  What do you think?

Tuesday, February 21, 2012

Spring Basket


 Raise your hand if you are ready for Spring?

Picture me raising my hand.  I am ready.  We have had a pretty mild winter as far as winters go.  But, I am ready for lush.  I am ready for color.  I am ready for new life and green growing things.

If Mother Nature isn't going to cooperate, I am going to be forced to take matters into my own hands.  And you can too.

This is super easy and relatively inexpensive.  Grab a basket from your stash.  I know you have one.  Or a bucket or a box.  Anything.  Gather a few little plants.  I picked up a couple of primroses from WalMart for a dollar each.  I added a fake green plant.  (Shh--don't tell anyone)  And I added a little pot of daisies that I grabbed at the grocery store for a couple of dollars.


I took the foil papers off of my plants and removed the planting instructions.  You can replant them into a little pot or just leave them as is.  Remember that when you water them the water could run out of the temporary pots and flood your area.  Take precautions, or just pull the little pots out when you water them to let them drain.

 
I thought my basket needed a little something, so I lined it with a scrap of burlap.  Then I just packed the plants in there.  Pack them good.  Fit as many as you can.  You want your basket to look full.  Add a bow if you want to the handle of your basket.  Place it on your kitchen table or counter.  Somewhere that will make you happy.

Now sit back and dream of sunny days!


And when the sun finally does start to shine, take those little plants and transplant them to a lucky spot in your garden.

*****

I'm linking up with:

Friday, January 13, 2012

Lucky Dragon Eggs


 If you read this post, you know that my family is anxiously awaiting the arrival of the new lunar year.  Chinese New Year is the most important traditional Chinese holiday.  It is also known as the Spring Festival.  The festival will begin on the 23rd of January this year and last for fifteen days, ending with the Lantern Festival.  "Twenty Twelve" is the year of the dragon.  


In honor of the dragon, we decided to make these lucky dragon eggs to open as we celebrate the new year.  The Chinese associate eggs with long life and happiness.  They consider eggs to be very lucky.  It is often incorporated into their various celebrations.  Although, probably not quite like this.  


First you need to buy some eggs.  We decided to make six dragon eggs of luck.  Wash and dry them well.  Now you want to punch a small hole on each end of the egg.  I found that a thumbtack and a small hammer or mallet works well for this.  Keep a light hand or things could go terribly wrong.  Once you have a small hole you can enlarge it a bit with a toothpick.  

I found it helpful at this point to stab a toothpick through the hole into the heart of the egg.  (That sounds a bit harsh, doesn't it?)   This will puncture the yolk and make it much easier to get the contents of the egg---shall we say, out?  


Now for the fun part.  You will need a small bowl.  Wipe the outside of the egg--you want it to be clean.  Put the egg to your mouth and blow blow blow!  (Just a little word of advice.  Do not under any circumstances suck in!)  My daughter loved this part--you just can't help but giggle.  The eggy part of the egg should now be in the bowl and you should be left with just the shell.


Rinse the egg under running water.  You want some water to get inside the egg.  Shake it up to clean out your shell.  Then you may need to blow again to get the water all out.  


Repeat with the remaining eggs. Now you need to let your eggs sit and dry overnight.  
Phase One Complete.


Once you are sure your eggs are dry, you are ready for Phase Two.  

How exactly do you tell a dragon egg from a normal old chicken egg?  Well, all dragon eggs have a small dragon symbol on the outside!  (I totally just made that up.  But it sounds right to me.)  You will want to print this little dragon symbol out to make sure your eggs are properly identified.

All you need to do now is modpodge your dragon symbol onto your egg.  I was out of Mod Podge, so I just diluted some Elmer's glue with a little bit of water.  Put some glue on your egg and put your dragon symbol over the top.  Then I brushed some more glue over the top of the symbol.  You will probably need to use your finger to smooth it all out.  


While your glue is drying,  you need to decide what you want to put into your dragon eggs.  There are many options.  You could fill them with confetti.  If you choose to go this route, you may want to enlarge one of the holes to make it easier to get your confetti in.  You could write a fortune on a strip of paper, roll it up and stick it into the hole.  Or you could put a dollar bill inside.  Of course, you could also do any combination of the three.  We chose to do fortunes and make one of the eggs extra lucky by putting some money into it.  


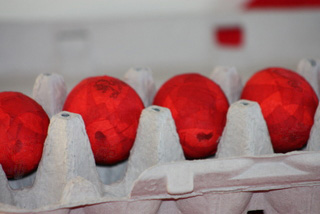
Now you want to seal up your hole and decorate your egg.  You will need some red tissue paper for this part.  (red paper napkins would also work)  Red is definitely the color of choice for Chinese New Year.  The Chinese believe that red scares away evil spirits and bad fortune.  Cut your paper into small squares.  ModPodge or glue red squares of paper over the holes in your egg.


We are almost done, let's get this whole egg thing wrapped up, shall we?    Modpodge layers of the red paper squares over the egg until the shell is completely covered. 


 The dragon symbol should show through the tissue paper.  Let your eggs dry completely.  Set them aside until New Year's Eve. 
Phase Two Complete.


At the appropriate time  crack open your lucky dragon eggs and see what the new year holds in store!  These little guys are pretty solid.  Hopefully we will be able to get them to crack.  We may have to use that little hammer!
*****
Just to be clear, this is not a traditional way of celebrating Chinese New Year.  
This is just us having some fun!


Thursday, December 22, 2011

Memory Tree Ornaments


Well now that Christmas is literally upon us, I thought I'd finally show you some of the ornaments I've been working on this year.  I have been wanting to do this for quite some time.  I love the Christmas trees decorated with framed pictures.  Have you priced out those cute little frames?  YIKES!  So, I took matters into my own hands.

The first step was to rifle through all of our old Christmas photos.  Luckily this isn't hard to do now that most of our pictures are digital.  It isn't easy to narrow down the selection to just a few favorites though.  I chose some really old photos from my childhood (that's me up there with my little brother) and I chose some from each of the eighteen years we have been together as a family.  I ended up with one hundred photos that I wanted to feature on the tree.  Why one hundred?  Well, the real reason was that I had a coupon for a hundred free 4x6 prints.  I don't think I will end up using them all on the tree.  But now I have them printed for future projects.  I decided I wanted them to have a vintage feel.  So, I printed all of them in sepia.  To have a couple of different size options, I used my photoshop to put two pictures side by side.  Then I just cut them with a paper cutter when I got them back from the printer.  The final size of these smaller pictures was 3x4.  (So really I have more than a hundred pictures-sweet!)

Now to "frame" them. 

We had some bead board left over from this project.  The pieces were too small to use in the house.  But they were perfect for cutting down and making "frames".  They aren't really frames so much as just mats.  My husband and daughter (she has now been power saw approved!)  spent a few days cutting the boards.  We made them just barely bigger than the pictures.  I wanted to keep the size and weight of the boards down as much as possible.  But I like the white matted look.  So, I left a little edge.

After the boards were cut, I grabbed my pictures and my ModPodge and got to work.  I covered my work surface (in this case my kitchen counter) with newspaper.


I put a thin coat of glue on the bare board, using a foam brush.  Then I positioned my photo and followed up with another thin coat of glue.


There is a moment or two of panic when you glop the glue all over the photo.  But, don't worry...it will dry clear and the photo will survive.  I promise!  I let my photos dry overnight.

To finish them up, my husband drilled a hole in the center top of each board.  You will want to drill from the back.  (We did add some hangers to the back of a few to avoid drilling through someone's head)


I looped some ribbon through and tied a bow.

Ta Da--lots and lots of wonderful family photos to hang on the tree.

*****
Want a cost breakdown?

frame boards--leftover beadboard.  FREE
ModPodge-leftover from many other projects.  Free to me.  But if you had to buy new, it would only cost a couple of bucks
printed photos-FREE with coupon
ribbon-70% off at JoAnn's this week.  Each spool came to under a dollar.
Total cost-$5.00

memories-priceless!


Even as we worked on this project, the kids were commenting on the photos and recalling wonderful Christmas memories.  It was so fun to listen to them reminisce.
Related Posts Plugin for WordPress, Blogger...