Showing posts with label St Patrick's Day. Show all posts
Monday, March 17, 2014
[St Patrick's Day] Lucky No. 7
Is there a number luckier than seven?
How about when you add it to eleven? I'm not talking eighteen. I'm talking 7-eleven! Nothing is luckier than that. Especially when it involves Slurpees!
And a gift card.
My boy is in California. He is a missionary for The Church of Jesus Christ of Latter-day Saints. He is riding his bike in the California heat. All day long. This just might be the perfect way for him to stay cool this summer. I'm thinking every high school and college student I know could put this to good use. Cut two pieces of white card stock to measure 5 3/4 inches square. Measure in 1 1/4 inches from one of the sides and fold. Repeat with the other piece. This little flap will eventually make the pocket for the gift card. Click here for the "Lucky no. 7" printable. Cut out the card front and glue it to one of the card stock pieces. Line up the card stock so the flaps meet in the middle. Glue carefully around the sides and the back of the flap. Leave the front open. That's where the gift card slides in! I used some green patterned paper to embellish the pocket and the back of the card. I wanted to leave the inside of my card white so I could write a little letter. But whatever tickles your fancy. Go crazy if you want. Have fun.
Write a sentiment or two. Send your love. Then slip the gift card into the pocket. Slide the card into an envelope and send that fun-mail on it's way!
Happy St Patrick's Day!
Tuesday, March 11, 2014
Root Beer Float Gift Tags
It's the month to be lucky!
I was lucky enough to find this idea on Pinterest yesterday by Making Life Whimsical.
Unfortunately the link on Pinterest led to nowhere productive. That's unlucky.
(If you know where to find the true source, please leave me a comment.)
Luckily I had some time today to alter this very clever idea.
I needed a quick and inexpensive birthday gift for some friends that are lucky to be born in March.
Now you are lucky too!
Just click on the link and you can print your own Root Beer Float Birthday Tags. Attach the tags and a straw with some ribbon to a bottle of IBC Root Beer.
So Lucky!
Thursday, March 7, 2013
Soda Pop Walk
Our local elementary school is having a fund raiser tonight. Part of that involves a soda pop walk. Have you ever heard of that before? Me either. Apparently it is akin to a cake walk. Cake was sort of out of the question--because our school has a strict policy about homemade treats. So they opted for soda pop. The kids were asked to decorate a 2-liter bottle of pop to have as prizes for the "walk". And really that was all the instruction we were given.
OK. So now that you are all up to speed. Want to see what we came up with? In honor of the two up-coming holidays...
This little guy has a heart of pink lemonade! You may recognize his britches from here. The soda pop bottle fit perfectly! We wrapped the bottle in brown craft paper, added a face and some ears. My daughter thought he needed a bowtie. And I wholeheartedly agreed!
This bottle of Fanta orange shouted "spring" to my kindergartner. She thought a spring scene was definitely the way to go. She created this almost entirely on her own. I punched out the flowers and helped her glue her scene onto the bottle. I thought it turned out so cute. I love the flowers and the little bunnies. Those must be baby bunnies. Not all of them have caught on to the art of hopping yet. I guess we all must fall sometimes.
Who knew that a bottle of pop could be such a fun canvas for creating!
OK. So now that you are all up to speed. Want to see what we came up with? In honor of the two up-coming holidays...
This lucky leprechaun started out life as a bottle of Sprite.
We added a few embellishments, made a few snips with our
scissors, applied glue generously, and...lo and behold his true identity was discovered!
This little guy has a heart of pink lemonade! You may recognize his britches from here. The soda pop bottle fit perfectly! We wrapped the bottle in brown craft paper, added a face and some ears. My daughter thought he needed a bowtie. And I wholeheartedly agreed!
This bottle of Fanta orange shouted "spring" to my kindergartner. She thought a spring scene was definitely the way to go. She created this almost entirely on her own. I punched out the flowers and helped her glue her scene onto the bottle. I thought it turned out so cute. I love the flowers and the little bunnies. Those must be baby bunnies. Not all of them have caught on to the art of hopping yet. I guess we all must fall sometimes.
Who knew that a bottle of pop could be such a fun canvas for creating!
Friday, March 1, 2013
[St. Patrick's Day] It's Your Lucky Day
What says "lucky" more than an anonymous treat left on your doorstep? I can't think of a darn thing. Especially if that treat is packaged up all cute and lucky-like. And even more especially if it that happy-go-lucky package contains fudge mint brownies. They're frosted with green buttercream and drizzled with chocolate. They're delicious!
It just doesn't get any better than this people.
You will need to make some brownies. Try this recipe. It's the only one you will ever need. It will make enough batter for two of these cute little pans.
I found these handy little aluminum pans at the WalMarts. They are called "Rectangle Pans with Board Lids." They come three to a package and cost pennies more than a dollar. Lucky? I think yes.
Bake your brownies and allow them to cool. Then frost them generously with mint buttercream frosting. Drizzle with melted chocolate to take them right over the edge. After all...these are lucky brownies!
The thing I loved best about these aluminum pans, is their cardboard tops. A blank canvas just screaming to be jazzed up a bit. Don't you think?
Go ahead and put the plain old boring cardboard topper on your pan. But don't crimp the edges closed just yet.
Print out one of these little guys and trim it to size. My treat box measures about 8" x 6". You could trace the original one around your print-out to make sure you get it right.
Place our lucky topper on top of that old boring one and crimp the edges closed. Now wrap some cute green baker's twine around and around and finish it off with a lucky tag.
We just can't wait to doorbell ditch these lucky treats on some unsuspecting neighbor. Won't you join us?
The best thing about this little project? It makes two! You can give one away and keep one for yourself. Now that is lucky!
I'm linking up with:
Wednesday, March 7, 2012
[St Patrick's Day] Peppermint Patty Favor
Are you looking for a quick little treat to give to your friends, co-workers, or teacher this St Patrick's Day? Do you need a simple party favor? Have I got an idea for you! It only takes three items to pull this cute favor off.
1. Pearson's Peppermint Patty (I bought the large patties-there are 2 per package)
2. Cute little tag (print out below)
3. baker's twine or ribbon (green of course)
Print out the tags and cut them out. Punch out the holes on each side. Thread the twine through the holes and wrap around the peppermint patty package. Tie it in a bow. That's it. You're done. Give them away to all of your lucky friends and they won't even be tempted to pinch you!
I chose to put a white wrapper around my candy first, so the tag would
show up better (you know, for the pictures). I pulled out a white envelope and sealed it. Then I
cut off each side and slid my candy in. Simple.
*****
I'm linking up with:
Monday, February 27, 2012
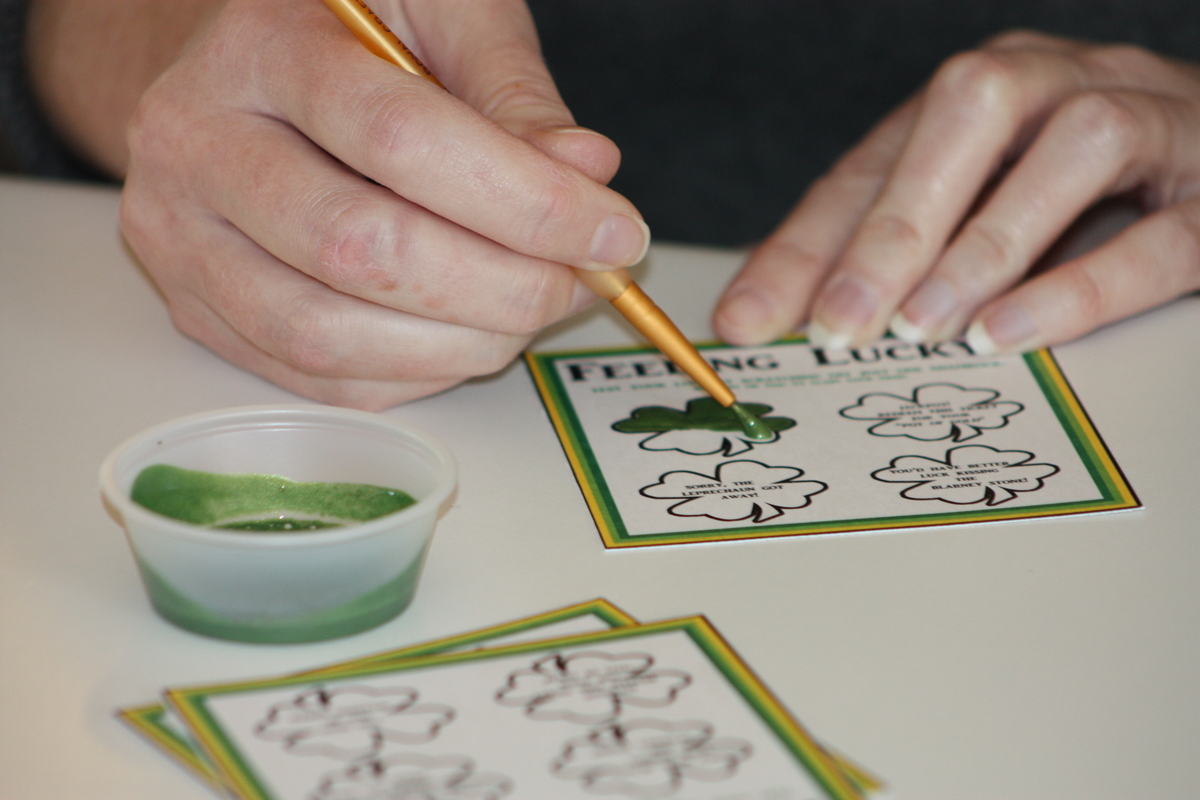
[St Patrick's Day] Scratch Your Luck Cards
Are you feeling lucky?
I have been noticing these fun scratch cards lately. They seemed like the perfect fit for a St Patrick's Day craft. And they are quite easy to make. Especially when I have done all of the hard work for you! See, you are lucky!
You just need a few supplies:
free scratch card printable (see below)
metallic acrylic paint ( I chose a fun green color)
dish soap
small paint brush
clear contact paper
Print out the sheet of scratch cards (click on the printer icon at the bottom of this post). Cut out the cards. Next comes the contact paper. I cut my contact paper to 3 1/4 inches by 4 inches. Peel the backing away and carefully place the contact paper over the card. You want the contact paper to cover the four shamrocks. This allows the "player" to easily scratch away the paint. Don't be like me and start painting before you put the contact paper on. Yeah, I did that twice! Uggh. (I imagine you could also use clear packing tape in place of the contact paper, but I haven't tried it.)
Now for the fun part. Mix 2 parts of paint with 1 part of dish soap. I painted twelve cards with just a couple of tablespoons of the paint mixture. Paint over each of the shamrock shapes using a small tipped brush. Let dry. Apply more paint if needed to conceal the words. Dry completely.
That's all there is to it! There are four different card varieties and every card has the potential to be a winner. You may want to tape a quarter onto the back to expedite the scratching!
I am looking forward to slipping a few of these lucky scratch cards to my kids on the 17th!
For the "prize", I decided to put some gold wrapped candies (rolos, peanut butter cups, almond Hershey kisses or Hershey nuggets work well) in a cellophane bag. My kids are really looking forward to attending a midnight opening show of The Hunger Games. It opens in theaters about a week after St. Patrick's Day. I may or may not slip some tickets into their pots of gold! We'll have to see how lucky they really are.
*****
I'm linking up with:
Subscribe to:
Posts (Atom)