Showing posts with label home projects. Show all posts

Monday, April 23, 2012

Clothespin Bag


If you know me personally, you know that I love hanging clothes on the line.  I love the crispness of line-dried clothes and I love the fresh smell that the breeze gives to my clothes.  A couple of years ago, I did an experiment and found that drying my clothes outside saved me between ten and fifteen dollars a month on my electricity bill.  I especially love that!  Do you like to line-dry your laundry?  At first thought, it would seem that hanging the clothes on the line makes for more work.  To that I say, just try it and see what you think.  Laundry is my arch nemesis.  I hate everything about it.  Especially folding.  But when I started hanging my clothes out on the line, my whole attitude about laundry changed.  Weird, I know.  I think it has to do with being out in the sunshine instead of locked in the laundry room.  I wash and hang four loads of laundry in about an hour and a half.  You can wash load after load without having to wait for the dryer.  Then I just let the clothes hang until they are dry and I am good and ready.  They all come down at once and are folded right away.  And I've figured out how to clip them so I don't have to iron anything! 


So, in honor of Earth Day I offer you this clothespin bag--to make your laundry day a little easier. All you need is a bit of fabric, some bias binding tape (you can make your own or buy it at any fabric store), some thread and a sewing machine.  Oh yeah...and a pants hanger.

You will want your bag to be just a bit wider than the pants hanger.  You eventually want your hanger to clip inside.  My hanger measured twelve inches wide.  I cut my fabric 13 inches wide.  This allowed for a 3/8 inch  seam and about a 1/4 inch of play.  I cut my fabric sixteen inches long.  You will need two pieces, one for the front and one for the back.  My hanger was a bit rounded, so I rounded that top of my fabric pieces just a bit.  Some hangers are flat, just do what you gotta do.  Next, you are going to want to cut a "U-shaped" piece out of your front piece.  This will be the opening of the bag.  It's easiest to fold your piece in half vertically and cut half of the "U" so it comes out symmetrical.  I left about 8 inches intact between the bottom of my "U" and the bottom of the bag.  And I left 3 inches on each side.  Discard the piece that you cut out.

Match the right sides of your fabric pieces together.  Now sew up all of the sides of your rectangle.  Flip your bag right side out.  Next sew your binding around your opening.  I liked a thinner look, so I cut my packaged binding in half lengthwise.  If you haven't ever worked with binding tape, this tutorial might be helpful.


That's all there is to it!  Open your pants hanger and slip one side of it into the opening.  Close your hanger.  The idea is to sandwich the back of your bag between the hanger.


Fill your bag with clothespins and you are ready for a full day of laundry!  I like to just slide the bag along the line as I hang.  Super handy.


Happy Earth Day!

I'm linking up with:

Thursday, April 19, 2012

Memory Board


I have a stack of old cedar fence planks sitting in my garage.  We had to replace a section of our fence a while back and I just couldn't bear to throw them away.  I thought they might look cool as some type of photo display.  I had an idea in my head.  Well what I eventually ended up with, was nothing like that original idea.  But I like it better.  It's all a work in progress, right?


I got out the power saw.   Aren't you proud of me?  Usually I have my honey do that kind of stuff for me.  But today I hitched up my britches and just did it myself.  I found some relatively straight boards and cut them into various lengths.  Here they are in all their weathered and spidery glory.


After I wiped them and cleaned them up a bit, I arranged them and attached a cross board to the back to hold them together.  I just used some old grabber screws that we had in the garage.  I didn't bother to sand them or anything.  I wanted a really rustic look.  Next I took out my trusty rusty hammer and pounded some nails in for some photo clips.  Which I forgot to take a picture of...sorry.


I thought it needed a little something, so I stenciled "family" at the bottom.  I think it turned out kind of fun.  I put it in my honey's office so he would have a place to display his treasures.  He can just tack or staple whatever he wants onto there with no fear of it ruining the wood. 

And that's all it took.  If you would like to make one, come on over.  We still have a lot of nasty lovely weathered cedar planks in the woodpile.

Wednesday, April 11, 2012

Happy Day Punch Cards

Sorry for the sporadic or should I be honest and say "lack of" posts lately.  We are on spring break around here.  Normally that would mean that we high-tail it to the mountains for some family fun and relaxation.  But this year we needed to stay close to home.  So we are taking advantage of the extra time to get some things done around the house.  Both of my older kids are in dire need of some extra cash.  I am more than happy to pay them for extra work around the house.  I am not talking your average everyday chores.  I could tell you my philosophy on that, but I will save it for another day.  I am talking extra projects that I need help with.  I make them work hard for the money!  The problem is, that I am not so good at keeping track of what they've done and whether or not I have paid them.  So I devised this punch card system to keep track of the hours they work.  When the card is full, they can trade it in for cash.  It's up to them to keep track of their punch card.  We've been using them for a couple of days now and they are working like a charm!

This is how it works...determine how much money each smiley face is worth and write it on the left side.  Then just use a hole punch and punch out a smiley face for every hour worked.  Simple.

Want to know what we've been working on?  It's amazing what can get done when three or four "adults" are working together!  So far we have...

*washed, vacuumed, and prepped the boats for some summer fun

*scrubbed all of the cars inside and out

*tilled the garden, amended the soil, and planted some spring vegetables

*cleaned up the yard from a long winter--lots of leaves and lots of sticks!

*weeded the lawn and fertilized

*fixed the swing set (we came across an extra slide that the neighbor was getting rid of, so we moved the stairs  to the back of the fort and now we have two cool slides coming off of the front!)

*hosed down the siding and all of the porches

*pulled out all of the wicker and other patio chairs- cleaned them and got them all set up for spring/summer

*cleaned the grill

*cleaned the garage

*cleaned the shed

I'm sure that I am missing some stuff, but you get the idea.  We have had gorgeous weather the past couple of days, so we have been concentrating on outside projects.  All of that is about to change though.  So, maybe we will head inside and do some spring cleaning?


UPDATE:

My littlest one is not quite old enough to work for an hourly wage yet. But, she wanted in on the fun. So, I made up a punch card for her too. This one is job based instead of time based. For every extra job she does, she gets a punch on her card. Decide beforehand how much each smiley face is worth and write it on the side. Nickel? Dime? Quarter? Maybe even a dollar? Whatever you think is fair.

Would you like to have some punch cards for your kids?  Just click on the printer icons below, print and cut out your cards.  That's all it takes! 

Tuesday, February 21, 2012

Spring Basket


 Raise your hand if you are ready for Spring?

Picture me raising my hand.  I am ready.  We have had a pretty mild winter as far as winters go.  But, I am ready for lush.  I am ready for color.  I am ready for new life and green growing things.

If Mother Nature isn't going to cooperate, I am going to be forced to take matters into my own hands.  And you can too.

This is super easy and relatively inexpensive.  Grab a basket from your stash.  I know you have one.  Or a bucket or a box.  Anything.  Gather a few little plants.  I picked up a couple of primroses from WalMart for a dollar each.  I added a fake green plant.  (Shh--don't tell anyone)  And I added a little pot of daisies that I grabbed at the grocery store for a couple of dollars.


I took the foil papers off of my plants and removed the planting instructions.  You can replant them into a little pot or just leave them as is.  Remember that when you water them the water could run out of the temporary pots and flood your area.  Take precautions, or just pull the little pots out when you water them to let them drain.

 
I thought my basket needed a little something, so I lined it with a scrap of burlap.  Then I just packed the plants in there.  Pack them good.  Fit as many as you can.  You want your basket to look full.  Add a bow if you want to the handle of your basket.  Place it on your kitchen table or counter.  Somewhere that will make you happy.

Now sit back and dream of sunny days!


And when the sun finally does start to shine, take those little plants and transplant them to a lucky spot in your garden.

*****

I'm linking up with:

Tuesday, January 3, 2012

French Doors on the Cheap

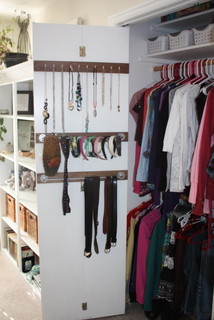
Do you have teenagers at your house?  We love our teens!  So.  Much.  Fun!  My teenage daughter decided it was time for her to have her own room.  Mom agreed.  But unfortunately, that meant that Mom had to give up her craft room.  I now have a "craft corner".  (But that's a post for another day).  Sadly for her, this move also meant a downsize.  We were in desperate need of storage space.  As I stepped back and took a look at what our options were, my mind was drawn to the closet.  In particular, the doors.  Her new room had some standard issue bi-fold closet doors.  If we could swap out those doors for some french doors, we would have a lot more real estate to work with--on the back side!


I thought it would be an easy swap.  Head down to Home Depot, buy some solid french style closet doors, come home and install them.  Things are never as easy as they should be.  It turns out that French doors have different specs.  We would have to remove the old doors and the old casings.  We would then have to cut a larger opening, and completely re-do all of the finish work (casings, putty, caulk, paint, the works!)  Not happening.

I was about to give up on the whole idea, when my husband came up with a truly genius idea.  Why couldn't we just turn the bi-fold doors that we have into "french" doors.  We could fasten the two halves together and treat them like a solid door.  We would just have to take the medial pins out of the track.  And that's exactly what we did. 


We found some slim metal plates that we used to fasten the two halves of each door together at the top and the bottom.  We also decided to just screw some wooden boards to the inside of the doors.  These had two purposes...it stabilized the bi-folds even more, and it enabled us to install hooks and rods for our daughter to use for her accessories.  I was a little bit worried about the stress on the remaining pins in the track.  But so far, we haven't had any problems.  And if we decide that we want our old doors back?  No problem, just remove the plates and the boards and put the pins back in the track.  Completely reversible--I love that!


On the top board, we just screwed in some cup hooks from WalMart.  We purchased the metal rods at IKEA.  They are the perfect solution for her jewelry, scarves, hats, head bands, and belts.  On the other side, we hung a shoe pocket holder thingy.  The doors have worked out perfectly!  She loves her closet.  She loves her room.  She loves her new found freedom!

*****

[There is one other problem that you will encounter if you try this at your house.  The doors can now swing "in" as well as "out".  You will need to install a block of some kind at the center top of your closet to prevent the doors from swinging in.  You may also want to add some magnets to hold them closed.]


Thursday, December 22, 2011

Memory Tree Ornaments


Well now that Christmas is literally upon us, I thought I'd finally show you some of the ornaments I've been working on this year.  I have been wanting to do this for quite some time.  I love the Christmas trees decorated with framed pictures.  Have you priced out those cute little frames?  YIKES!  So, I took matters into my own hands.

The first step was to rifle through all of our old Christmas photos.  Luckily this isn't hard to do now that most of our pictures are digital.  It isn't easy to narrow down the selection to just a few favorites though.  I chose some really old photos from my childhood (that's me up there with my little brother) and I chose some from each of the eighteen years we have been together as a family.  I ended up with one hundred photos that I wanted to feature on the tree.  Why one hundred?  Well, the real reason was that I had a coupon for a hundred free 4x6 prints.  I don't think I will end up using them all on the tree.  But now I have them printed for future projects.  I decided I wanted them to have a vintage feel.  So, I printed all of them in sepia.  To have a couple of different size options, I used my photoshop to put two pictures side by side.  Then I just cut them with a paper cutter when I got them back from the printer.  The final size of these smaller pictures was 3x4.  (So really I have more than a hundred pictures-sweet!)

Now to "frame" them. 

We had some bead board left over from this project.  The pieces were too small to use in the house.  But they were perfect for cutting down and making "frames".  They aren't really frames so much as just mats.  My husband and daughter (she has now been power saw approved!)  spent a few days cutting the boards.  We made them just barely bigger than the pictures.  I wanted to keep the size and weight of the boards down as much as possible.  But I like the white matted look.  So, I left a little edge.

After the boards were cut, I grabbed my pictures and my ModPodge and got to work.  I covered my work surface (in this case my kitchen counter) with newspaper.


I put a thin coat of glue on the bare board, using a foam brush.  Then I positioned my photo and followed up with another thin coat of glue.


There is a moment or two of panic when you glop the glue all over the photo.  But, don't worry...it will dry clear and the photo will survive.  I promise!  I let my photos dry overnight.

To finish them up, my husband drilled a hole in the center top of each board.  You will want to drill from the back.  (We did add some hangers to the back of a few to avoid drilling through someone's head)


I looped some ribbon through and tied a bow.

Ta Da--lots and lots of wonderful family photos to hang on the tree.

*****
Want a cost breakdown?

frame boards--leftover beadboard.  FREE
ModPodge-leftover from many other projects.  Free to me.  But if you had to buy new, it would only cost a couple of bucks
printed photos-FREE with coupon
ribbon-70% off at JoAnn's this week.  Each spool came to under a dollar.
Total cost-$5.00

memories-priceless!


Even as we worked on this project, the kids were commenting on the photos and recalling wonderful Christmas memories.  It was so fun to listen to them reminisce.

Monday, November 21, 2011

The Big Reveal

OK, so I have been wanting to refinish my kitchen cabinets for a very very long time.  I stewed and stewed over what to do.  I painted my bathroom cabinets first, just to see how crazy it made me and if it really was something we could do on our own.  I figured I would start with just four bathroom cabinets before I delved into the entire kitchen array.  That was a year ago.  I have loved my bathroom!

Finally we pulled ourselves up by the bootstraps and began to tackle the kitchen.  It has taken us about a month.  My honey is the master painter.  He took three days off of work and we got the bottom cupboards finished.  We have been working on the top cupboards on the weekends ever since.  I decided to paint the top ones white and the bottom ones green.  We added bead board to the island and the ends of the cabinets.  I LOVE bead board!!  Then we glazed them to give them a more antique look.  I love how they turned out!

Want to see?

Before


 (This is a really old photo--the kids are so small!)

After


That before picture was taken in 2005.  And yea, I still have the same curtains and the same canisters.  If you could have seen the top of the cupboards you would have seen the same baskets and the same antique canning jars.  Those are the real deal by the way--from the early 1900s.  Not those new ones that everyone is painting green to look old!  Well, what can I say--I am nothing if not consistent.  I am thinking of making a new curtain to break up some of that white and I will probably add some greenery up top somewhere.  Who knows? 

So what do you think?
Related Posts Plugin for WordPress, Blogger...