Showing posts with label homemade cards. Show all posts
Monday, March 17, 2014
[St Patrick's Day] Lucky No. 7
Is there a number luckier than seven?
How about when you add it to eleven? I'm not talking eighteen. I'm talking 7-eleven! Nothing is luckier than that. Especially when it involves Slurpees!
And a gift card.
My boy is in California. He is a missionary for The Church of Jesus Christ of Latter-day Saints. He is riding his bike in the California heat. All day long. This just might be the perfect way for him to stay cool this summer. I'm thinking every high school and college student I know could put this to good use. Cut two pieces of white card stock to measure 5 3/4 inches square. Measure in 1 1/4 inches from one of the sides and fold. Repeat with the other piece. This little flap will eventually make the pocket for the gift card. Click here for the "Lucky no. 7" printable. Cut out the card front and glue it to one of the card stock pieces. Line up the card stock so the flaps meet in the middle. Glue carefully around the sides and the back of the flap. Leave the front open. That's where the gift card slides in! I used some green patterned paper to embellish the pocket and the back of the card. I wanted to leave the inside of my card white so I could write a little letter. But whatever tickles your fancy. Go crazy if you want. Have fun.
Write a sentiment or two. Send your love. Then slip the gift card into the pocket. Slide the card into an envelope and send that fun-mail on it's way!
Happy St Patrick's Day!
Monday, June 24, 2013
Pocket Notes
Have you ever just wished you had a little card on hand for those spur of the moment occasions when you want to leave a little note for someone? I have found myself in this situation a lot lately. You just have a few seconds. You don't need to send flowers. You don't need to give a batch of your favorite treat. You just need or want to write a few quick words on something more than the back of a WalMart receipt. Know what I mean?
Well, I think I've found the solution. I like to call them "pocket notes". They fit perfectly in your pocket or more likely your purse. The are the size of a business card. These are perfect for sliding under someone's windshield wiper, or slipping into their backpack or purse. You can slide them inside a door frame or tuck them into a coat pocket. These would be the perfect accompaniment to acts of random kindness.
I've made it super easy for you. Just print them out here. You can use a sheet of printable business cards (Avery 8371) or just print on a sheet of card stock and cut them out with a paper cutter or scissors.
It's just that simple. Now go and express yourself!
Tuesday, February 12, 2013
[Valentine] Round Chunky Post Card
Two days until Valentine's Day?!! Where did the time go? I might slam you a little bit in the next day or two with a bunch of posts. I still have so many valentine ideas that I want to get out to you.
First of all. Remember these beauties from last year? Chunky Love Post Cards.
Well, they were such a hit with the grandparents that I thought we'd do it again. This year I wanted to try a circular version. They are just a little bit trickier to cut out. But we enjoy a bit of a challenge, right?
You will need foam board, photos (I made these a bit bigger, so you will want 5x7 photos), spray adhesive, an exacto knife, a cutting mat, and this printable.
Follow the general directions here. I found it easiest to cut a rough square around the circular printable. Then I cut a square piece of foam board about the same size and shape. Spray the adhesive onto the foam board and attach the printable. Then make your precision cut around the circular border. This gives a more professional looking product. Once you have your foam board/post card cut out, trace around it onto your photo. Carefully cut out your photo. Once again spray the adhesive onto the blank side of the foam board. Attach your photo. Trim any overhang if necessary with your exacto knife.
Now all you have left to do is personalize your post card. Write a little note, tell your special someone how much you love them, or have your child draw a simple picture. I guarantee the recipients of these post cards will love them.
Just a reminder--you will want to have the post master weigh and hand stamp these cards. Just in case. I'd hate for them to get lost in the mail. I've had various rates applied to my post cards depending on the post master that is helping me. Some will just put a stamp on it. Others charge a bit more. Who knows? It's still very affordable and super adorable!
Friday, February 1, 2013
Just a Note
I've been needing to send some notes to friends and family. Thought you'd like to join in on the fun! Here's a free printable. Happy weekend everyone!
Wednesday, January 16, 2013
Think to Thank
I've still got a lot of thanking to do. I created this colorful card the other day and thought maybe you'd like to print a few too. Happy Wednesday everyone!
Friday, November 2, 2012
[The Gratitude Project] Friends
Today I am totally thankful for my friends. Old friends. New friends. Little friends. True blue friends. Even you...my bloggie friends! Thanks for coming here and appreciating what I have to offer. What better way to tell a friend how much you love them than by sending them an old fashioned handwritten note! Since I can't send each of you a handwritten note (although I would love doing that), I thought I'd share my homemade card with you. You can print it out and share it with your friend. It's like a gift within a gift!
You have several options here.
First Option.
Print out part one of the card template on a piece of heavy card stock. Assemble it as directed. Proceed to print out part two of the card template. Assemble. Write a heartfelt note on the insert. Tuck a fun gift card (I'm thinking frozen yogurt. You can't go wrong with that.) into the holder and mail it off.
Second Option.
No gift card required. Just print and assemble part one of the template. Then cut a 3x5 card out of matching card stock. Write a lovely note to your best friend. Punch a hole in the top and embellish with a ribbon. Slide the card into the sleeve and you are ready to mail!
Now go print one or two or three. Share the love.
Thanks friends. You are truly a blessing!
I'm linking up with:
Monday, February 27, 2012
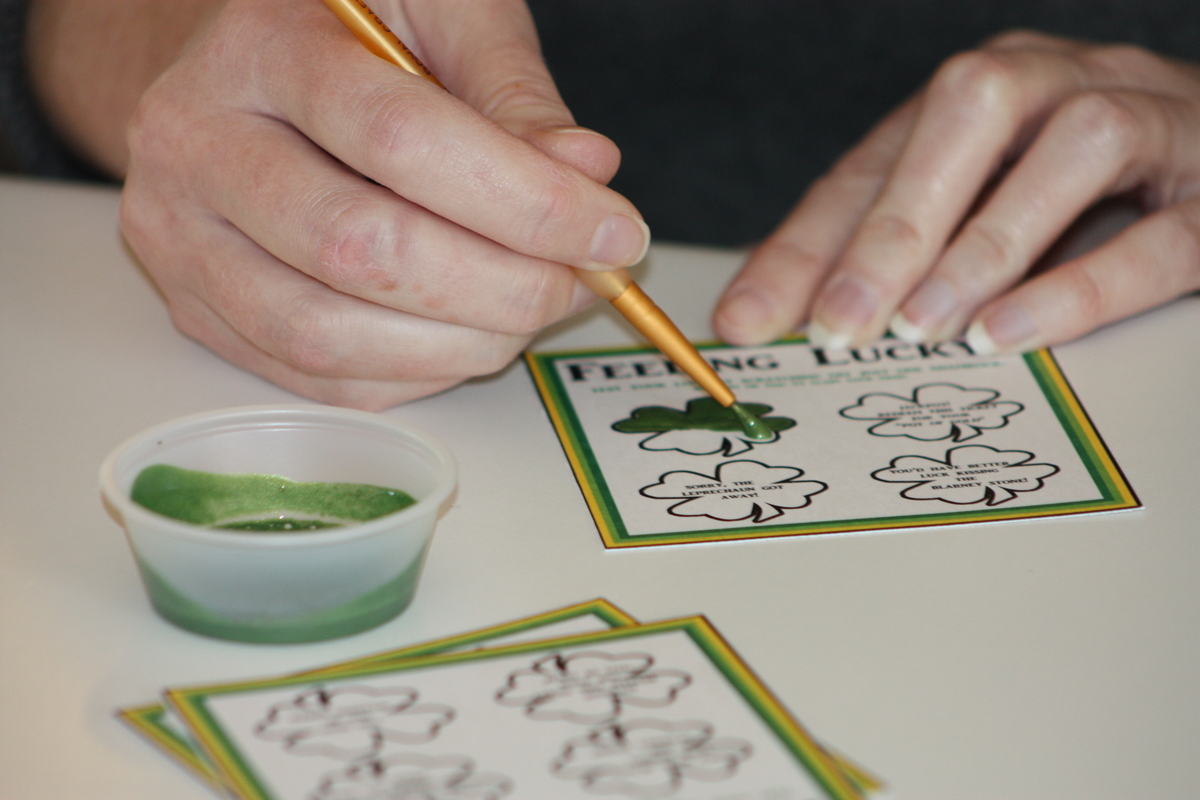
[St Patrick's Day] Scratch Your Luck Cards
Are you feeling lucky?
I have been noticing these fun scratch cards lately. They seemed like the perfect fit for a St Patrick's Day craft. And they are quite easy to make. Especially when I have done all of the hard work for you! See, you are lucky!
You just need a few supplies:
free scratch card printable (see below)
metallic acrylic paint ( I chose a fun green color)
dish soap
small paint brush
clear contact paper
Print out the sheet of scratch cards (click on the printer icon at the bottom of this post). Cut out the cards. Next comes the contact paper. I cut my contact paper to 3 1/4 inches by 4 inches. Peel the backing away and carefully place the contact paper over the card. You want the contact paper to cover the four shamrocks. This allows the "player" to easily scratch away the paint. Don't be like me and start painting before you put the contact paper on. Yeah, I did that twice! Uggh. (I imagine you could also use clear packing tape in place of the contact paper, but I haven't tried it.)
Now for the fun part. Mix 2 parts of paint with 1 part of dish soap. I painted twelve cards with just a couple of tablespoons of the paint mixture. Paint over each of the shamrock shapes using a small tipped brush. Let dry. Apply more paint if needed to conceal the words. Dry completely.
That's all there is to it! There are four different card varieties and every card has the potential to be a winner. You may want to tape a quarter onto the back to expedite the scratching!
I am looking forward to slipping a few of these lucky scratch cards to my kids on the 17th!
For the "prize", I decided to put some gold wrapped candies (rolos, peanut butter cups, almond Hershey kisses or Hershey nuggets work well) in a cellophane bag. My kids are really looking forward to attending a midnight opening show of The Hunger Games. It opens in theaters about a week after St. Patrick's Day. I may or may not slip some tickets into their pots of gold! We'll have to see how lucky they really are.
*****
I'm linking up with:
Thursday, February 16, 2012
Random Act of Kindness Day
Did you know that tomorrow is the official "Random Act of Kindness" day? Well, I didn't either until just a few minutes ago. But I think we should totally get on board with this. What a great way to start the weekend. Do you need a few ideas? I found over 200 ideas on this site. That should get the creative juices flowing! You could plan to do something BIG or just do something very simple. You could serve someone you know well, like a family member or a friend. Or you could surprise a stranger with something to brighten their day. Take a look at your day and see what fits. The point is to get outside of yourself. I was thinking yesterday about some of the people I know and love. Many of them are facing some pretty big challenges. I bet they could use a little sunshine in their lives. How about you? Do you know someone that you could bless with some kindness?
I made a little card to get you started. Two actually. Print them out. Trim them a bit. Fold. Write a little note. Sign your name or not. It's up to you.
Three cheers for kindness!!
Leave me a note in the comments...I'd love to hear what kind of random you've been up to!
*****
I'm linking up with:
Friday, February 10, 2012
[Valentine] Chunky Love Post Cards
What exactly should I call these?? Awesome! That's what I call them. I had this idea to send some Valentine post cards to Grandma and Grandpa who live far away. I wanted to make them really "pop" out, if you know what I mean. Something to truly set them apart from the other letters and bills. I settled on foam board. It really worked out well. The hardest part about this project, is deciding which photos of your little darling you want to use. You could browse through your files and find an appropriate two or three or ten. Or you could stage a special Valentine photo shoot just for the occasion. Either way, it's super fun! I threw these together in about half an hour. (Not counting photo developing time of course)
This is what you will need to make your own chunky love post cards:
4x6 photos of your little valentine
post card printables (see below)
foam board ( I got mine at Hobby Lobby for a couple of bucks)
spray adhesive
exacto knife
cutting mat
ruler and/or straight edge
1. Place your foam board on a cutting mat and cut into "post card" sized boards.
I used an exacto knife. Just place a ruler or straight edge where you want the cut to be. Press down firmly on the ruler. Carefully slide your knife down the ruler edge. I liked to score mine first and then go back and press harder to make the final cut.
After a bit of trial and error, I decided that it was best to make the foam board just a little larger than the photo. I cut my foam board 4 1/4 inches by 6 1/4 inches.
2. Once you have your boards cut, you are ready to adhere the photo.
Paper your spraying surface really well. I am not kidding--there is a lot of overspray! (I didn't take a photo of my spraying surface--sorry). Place your photo picture side down onto your paper. Spray the adhesive onto the back of your photo according to the directions on the can. Then carefully place your photo onto one side of the foam board. You will want to center the photo as best you can.
3. For the back of the post card, I decided to have the template printed at the photo lab as well. I thought it would look nice on photo paper. You could also print it out onto cardstock. For some reason, my prints came back a little skeewhompus.
The borders around the template weren't even. This made me slightly crazy. So, I decided to trim them a bit to make the borders even all the way around. You may or may not care. To each his own. Then repeat the step above to adhere the template to the back of the foam board.
4. Now, you should be all set! Write a little love note on the back. Or draw a cute picture. And guess what? Although these are slightly too big to qualify as an actual post card, you can mail them for just the cost of one stamp! That's awesome all right. (UPDATE: Take your cards to the post office and have them hand stamped just to be sure! We've received some conflicting information on the cost of mailing these cards.)
I have a feeling Grandma and Grandpa are going to LOVE their chunky post cards. And Grandma, if you are reading this...try to act surprised when you get one in the mail!
*****
If you would like to download the post card template for your chunky love valentines, just click on the appropriate button below. There is a pink version and a red version.
I'm linking up with:
Monday, December 26, 2011
Christmas Thanks
I hope that you all had a wonderful Christmas! We were so blessed to spend the day with family worshiping the Savior, sharing gifts, and enjoying one another's company. We were given so many beautiful gifts by many friends, family members and neighbors.
I wanted to encourage my children to express their thanks for the love that they were shown. So, I whipped up this simple "check the box" thank you card. This file will print four post cards. Just print them out, trim them, fill in the blanks, check the appropriate boxes and sign your name. You could add a little personal note or draw a picture on the back for that extra special touch!
Saturday, November 12, 2011
Operation Gratitude
Happy Day Project: Day Six.
Assignment: Appreciate those in service.
As I looked around the web, I found a site called operation gratitude. This organization sends hundreds of thousands of care packages to the troops. There are lots of ways to get involved. It was exactly what I was looking for. What a great way to honor our service men and women and celebrate Veteran's Day! My family decided to write some letters of appreciation to send to the troops. I might also sew up some quick neck gators with some extra fleece I have tucked away in my stash. We'll see. I found some patriotic coloring pages online for my daughter to color, and I made some simple cards to write a little note on. Got too much going on today? This would be a great project for Sunday afternoon or family night on Monday! So grab a pen or pencil and let's get to work!
Print this page and cut in half to make two thank you cards. (This card was designed using papers from weeds & wildflowers)
If you live close by, I'd be more than happy to ship your letters and pictures with ours. Just drop them by before the end of next week.
Wednesday, November 9, 2011
We are all about the Happy!
Happy Day Project: Day Three
Assignment: gift card to the homeless
This assignment was a bit harder for me. We don't have a large contingent of homeless people in my little town. At least not in the traditional sense (stand on the corner and hold up a sign--brother can you spare a dime?)
We do have a lot of people that have lost their homes and are now living with relatives or friends.
We do have a lot of people that have lost their jobs and come up against hard times. So, I decided that I would rather focus on that. I made a little gift card holder and bought a card to a local grocery store. I am going to gift it to someone that I know that could use a little extra somethin-somethin. It was hard to choose just one person to help. I sure wish I could do more.
This card is made in two parts. It's really quick to put together. The first is the outer envelope. The second is a "sliding" tag that has a little pocket for the gift card. Awesome.
Do you want to make one too?
Assignment: gift card to the homeless
This assignment was a bit harder for me. We don't have a large contingent of homeless people in my little town. At least not in the traditional sense (stand on the corner and hold up a sign--brother can you spare a dime?)
We do have a lot of people that have lost their homes and are now living with relatives or friends.
We do have a lot of people that have lost their jobs and come up against hard times. So, I decided that I would rather focus on that. I made a little gift card holder and bought a card to a local grocery store. I am going to gift it to someone that I know that could use a little extra somethin-somethin. It was hard to choose just one person to help. I sure wish I could do more.
This card is made in two parts. It's really quick to put together. The first is the outer envelope. The second is a "sliding" tag that has a little pocket for the gift card. Awesome.
Do you want to make one too?
Tuesday, November 8, 2011
handwritten notes? Definitely happy!
Happy Day Project. Day Two.
Assignment: write a note.
Handwritten notes. LOVE them. But I hardly ever send them anymore. Isn't that just the case? It's a lost art. So, I was thrilled with the opportunity. But, if I'm going to go to all the trouble to write a little note, I might as take it over the top. Right?
Homemade cards. They are truly the best.
This was the easiest card I have ever made. And I have made quite a few in my day. I used to belong to a card swap group. We exchanged homemade cards for years. Good times. This card took about ten minutes to make start to finish. Total. I printed out a little thanksgiving sentiment on a piece of patterned card stock. Then I sewed a scrap of ribbon to the bottom, pinching and folding it as I went. I think it turned out super cute. Just for kicks, I inked the edges.
Then to give it one more punch, I made a tiny little "thankful" banner and folded it up inside. Banners totally make me smile. It's like a little celebration.
Did you send a note today?
Write, stuff, lick, and stamp...
And just like that, you've made someone's day.
Assignment: write a note.
Handwritten notes. LOVE them. But I hardly ever send them anymore. Isn't that just the case? It's a lost art. So, I was thrilled with the opportunity. But, if I'm going to go to all the trouble to write a little note, I might as take it over the top. Right?
Homemade cards. They are truly the best.
This was the easiest card I have ever made. And I have made quite a few in my day. I used to belong to a card swap group. We exchanged homemade cards for years. Good times. This card took about ten minutes to make start to finish. Total. I printed out a little thanksgiving sentiment on a piece of patterned card stock. Then I sewed a scrap of ribbon to the bottom, pinching and folding it as I went. I think it turned out super cute. Just for kicks, I inked the edges.
Then to give it one more punch, I made a tiny little "thankful" banner and folded it up inside. Banners totally make me smile. It's like a little celebration.
Did you send a note today?
Write, stuff, lick, and stamp...
And just like that, you've made someone's day.
Subscribe to:
Posts (Atom)