Showing posts with label cookies. Show all posts
Thursday, January 16, 2014
[Valentine] A Classic Combination
Isn't about time we did a little doorbell ditchin? Valentine style? I thought so too. I found these aluminum pans with cardboard lids at WalMart. They weren't much more than a dollar for three pans. They measure about eight inches by six inches. These are the perfect vehicle for ditchin' some homemade treats.
I went ahead and designed a fun Valentine lid to put on top of the pans. The cool thing is...you have so many treat options. Just think of something that combines classic flavors.
Cookies are at the top of my list. Chocolate chip. Sugar cookies with buttercream frosting and sprinkles. Homemade Oreos. Snickerdoodles. Peanut butter dipped in chocolate. Mmmm.
Or if cookies aren't your thing, you could go with Sweetheart Popcorn. Or Valentine Chex Mix. Or Pink Party Mix. All solid choices.
Bake up those delicious treats and package them into your pan. Print out the box lid onto heavy card stock. Crimp down the foil edges and you are ready for business.
I suppose if you weren't in a ninja doorbell ditchin' kind of mood...you could just hand deliver them with a smile. That would be fun too.
For an alternate box lid...click here. Just a friendly warning. These may be ink intensive. You might want to print them at your local copy shop.
Saturday, January 26, 2013
[Valentine] Like Cookies and Cream
Valentine's Day is right around the corner! It's one of my most favorite holidays. And it's high time that we started getting our craft on. This is a very simple no nonsense valentine that would be perfect for the classroom. Easy to make. Easy to reproduce. Kid friendly. Affordable. Like I said--it's perfect!
Let's start by gathering our supplies.
You will need:
a package or two of Oreo cookies
Small plastic treat bags
Treat bag toppers (see below)
A stapler and staples
1. Print and assemble your bag toppers. This should be fairly self-explanatory. Cut them out. Fold them. Have your child address them.**
2. Put a couple of cookies in the treat bag. I chose Oreo cookies. (Double stuffed-duh. You could go with any sandwich type cookie obviously)
3. Staple the topper to the top of the bag.
Wha-la! You are done.
I told you that would be easy. Now go enjoy a cup of hot cocoa. Pat yourself on the back. Because your valentines are all taken care of.
**There is an alternative way to make these toppers. I know that some of you are averse to all that spendy computer ink. Don't worry, I've got your back. The second option that you have is to buy some cute cardstock at your local craft store. Cut it into rectangles. Mine measured about 3.5 inches by 4.5 inches. Fold those in half. Your topper should now measure about 1.75 inches by 4.5 inches. Print out the "white" part of the tag here. Cut them out and glue them onto your cardstock toppers. You will have to hand write the greeting on the back. Sorry. There are sacrifices that come with saving a few bucks.
I'm linking up with:
Monday, November 5, 2012
[The Gratitude Project] Neighbors
We live in the most amazing neighborhood. The perfect place to raise a family.
Today I am thankful for wonderful neighbors!
Tonight we are going to visit some of those fabulous families with a plate of goodies. You can do it too. It's easy.
Tell your neighbors you love them "a whole honey bunch" with a plate of fresh baked cookies!
There's a bit of a story behind this cookie recipe. If you haven't figured it out by now, I love to save a buck. One day while I was grocery shopping I decided that I could get a big ol' bag of generic breakfast cereal for much less money than a box of the name brand kind. I've bought the bagged cereal before and had relative success. But that was the kids' cereal. I hadn't been brave enough to try the generic version of my favorite cereal. What's my favorite cereal? Honey Bunches of Oats. Perfection in my mind. It's corn flakes and clusters or oat-ey goodness. How hard can it be to replicate that? I don't know what I was thinking, because---they are not the same thing! At. All. I couldn't bring myself to eat more than one bowl of the stuff. And I couldn't trick the kids into eating it either. Boo.
So, now I have a ginormous bag of cereal that is going to go to waste unless I get creative.
And that my friends is how the "Honey Bunch Cookie" was born!
The bagged cereal might not be that great covered in milk in my cereal bowl. But it's a super star in these cookies. They are dee-licious!. They are soft and very chewy warm out of the oven with the perfect amount of crunch. If you want them crispy you'll need to cook them a bit longer. I'm not going to lie to you...the dough is to die for. I almost didn't bake any of it into cookies. Just grab a spoon and dig right in.
Isn't it funny how life goes? This morning I had a bag of nasty cereal staring out of the cupboard at me. Now I'm not so sad that I have a gigantic bag of sub-standard cereal. In fact, I'm quite happy about it. I'll be able to make cookies for weeks!
Today I am thankful for wonderful neighbors!
Tonight we are going to visit some of those fabulous families with a plate of goodies. You can do it too. It's easy.
Tell your neighbors you love them "a whole honey bunch" with a plate of fresh baked cookies!
There's a bit of a story behind this cookie recipe. If you haven't figured it out by now, I love to save a buck. One day while I was grocery shopping I decided that I could get a big ol' bag of generic breakfast cereal for much less money than a box of the name brand kind. I've bought the bagged cereal before and had relative success. But that was the kids' cereal. I hadn't been brave enough to try the generic version of my favorite cereal. What's my favorite cereal? Honey Bunches of Oats. Perfection in my mind. It's corn flakes and clusters or oat-ey goodness. How hard can it be to replicate that? I don't know what I was thinking, because---they are not the same thing! At. All. I couldn't bring myself to eat more than one bowl of the stuff. And I couldn't trick the kids into eating it either. Boo.
So, now I have a ginormous bag of cereal that is going to go to waste unless I get creative.
And that my friends is how the "Honey Bunch Cookie" was born!
The bagged cereal might not be that great covered in milk in my cereal bowl. But it's a super star in these cookies. They are dee-licious!. They are soft and very chewy warm out of the oven with the perfect amount of crunch. If you want them crispy you'll need to cook them a bit longer. I'm not going to lie to you...the dough is to die for. I almost didn't bake any of it into cookies. Just grab a spoon and dig right in.
Isn't it funny how life goes? This morning I had a bag of nasty cereal staring out of the cupboard at me. Now I'm not so sad that I have a gigantic bag of sub-standard cereal. In fact, I'm quite happy about it. I'll be able to make cookies for weeks!
Thursday, June 14, 2012
Lazy Man Lofthouse Cookies
Well, I'm not likely to let a dough sit in the fridge overnight. If I want cookies, I usually want them right now! And as far as rolling the sticky dough--I wasn't really into that either. So, enter the lazy man version.
Make your dough following the recipe below. Don't bother putting the dough into the refrigerator. Just forge on! Scoop it with a large two tablespoon cookie scoop onto a cookie sheet lined with parchment or a silpat. Flour your fingers or the bottom of a cup and gently press the cookie balls to about a half inch thickness.
I actually did not look very closely at the oven temperature from the above recipe. So, I baked my first sheet at 350 degrees. After seven minutes, I looked and realized that they were not finished baking. Then I noticed my mistake. I went ahead and baked them for 4-5 more minutes at 350 degrees. After that, I corrected the temperature and baked the remaining cookies according to the recipe. Guess what? I liked my "mistake" cookies best. They held their puffy shape much better. The others tended to droop as they cooled.
So, after your cookies have baked at 350 degrees for 10-12 minutes (you want them just barely golden on the edges) remove them from the oven and place them on a cooling rack. When they have completely cooled, frost them with your favorite buttercream recipe. And don't neglect the sprinkles!
Now, if you are the type that need perfectly round cookies, you will probably want to roll out the dough and cut it with a cookie cutter. But, if you want a cookie in hand within 30 minutes, this is the method for you. What they lack in perfection they make up for in speed! These would be brilliant for a fourth of July picnic.
Saturday, February 18, 2012
Cherry Cups
In honor of President's Day and that infamous cherry tree, I offer you "cherry cups"! These are probably one of my all time favorite treats. I love them. When I make them, I have the tendency to want to eat them all. This recipe originated with one of my mother's old friends. It is worn and stained and barely keeping it together. You know that means it has to be good!
So, let's get started. Preheat your oven to 350 degrees.
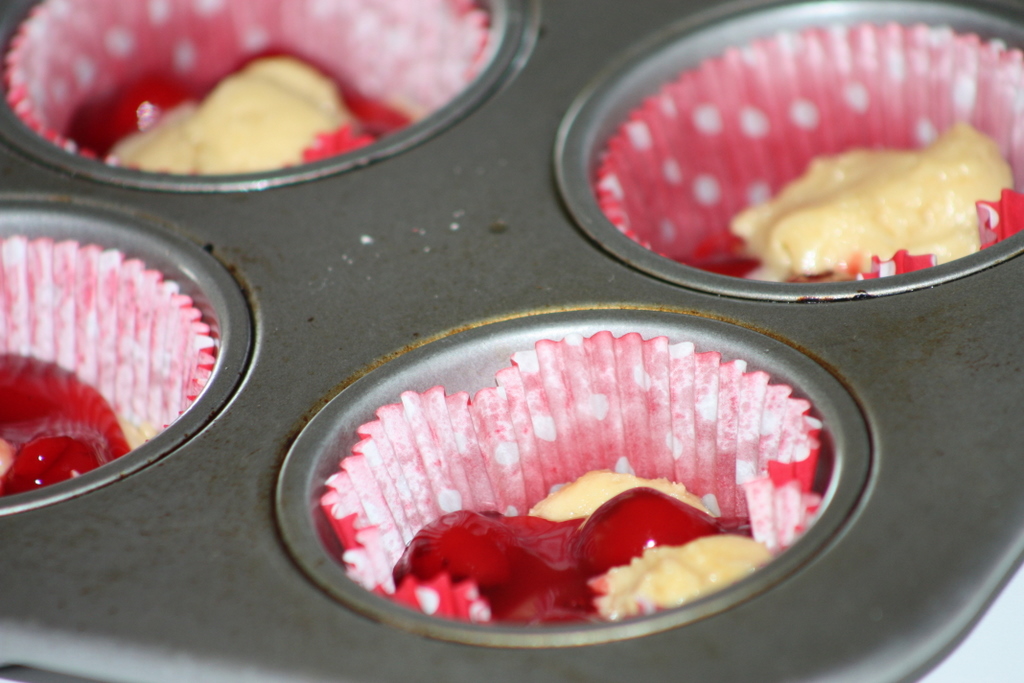
Put the sugar and the butter in your mixing bowl. Cream well. Add the eggs one at a time and beat well after each addition. Add the vanilla. Mix. Add the remaining dry ingredients and blend to incorporate. This is the yummiest dough EVER. I dare you not to eat a little. (I obviously don't subscribe to that whole raw egg thing) Line a muffin pan with muffin papers. Lightly spritz your muffin papers with PAM. (This will enable you to remove the papers more easily when it comes time to eat them!) Drop a scant tablespoon of dough into each muffin cup. Flatten slightly with your fingers or a small greased cup.
Open a can of your favorite cherry pie filling. Add 1 teaspoon of almond extract to the filling in the can. Stir. Spoon 1-2 cherries (and the accompanying glaze) into each muffin cup. Top with another 1-2 teaspoons of dough.
Bake for 20-25 minutes until golden brown and cooked through.
While your cherry cups are baking, you will want to whip up a powdered sugar glaze. In a small bowl, mix the melted butter, vanilla, milk, and powdered sugar until it is smooth and free of lumps.
When your cherry cups are baked to perfection, remove the pan from the oven and carefully remove each cup from the pan. I like to use a fork to gently lift them out. Drizzle with the glaze while they are still warm. Let them cool. Try not to eat the whole lot of them!
So, let's get started. Preheat your oven to 350 degrees.
Put the sugar and the butter in your mixing bowl. Cream well. Add the eggs one at a time and beat well after each addition. Add the vanilla. Mix. Add the remaining dry ingredients and blend to incorporate. This is the yummiest dough EVER. I dare you not to eat a little. (I obviously don't subscribe to that whole raw egg thing) Line a muffin pan with muffin papers. Lightly spritz your muffin papers with PAM. (This will enable you to remove the papers more easily when it comes time to eat them!) Drop a scant tablespoon of dough into each muffin cup. Flatten slightly with your fingers or a small greased cup.
Open a can of your favorite cherry pie filling. Add 1 teaspoon of almond extract to the filling in the can. Stir. Spoon 1-2 cherries (and the accompanying glaze) into each muffin cup. Top with another 1-2 teaspoons of dough.
Bake for 20-25 minutes until golden brown and cooked through.
While your cherry cups are baking, you will want to whip up a powdered sugar glaze. In a small bowl, mix the melted butter, vanilla, milk, and powdered sugar until it is smooth and free of lumps.
When your cherry cups are baked to perfection, remove the pan from the oven and carefully remove each cup from the pan. I like to use a fork to gently lift them out. Drizzle with the glaze while they are still warm. Let them cool. Try not to eat the whole lot of them!
*****
The original recipe that I received from my Mom called for making the dough into cherry bars. Which is a great option. It's fast and easy and you can cut them into squares after they are baked and iced. The cherry cups are a little more portable and not as fragile. You may want to eat the bars with a fork. If you want to make this recipe into bars, just follow the instructions below:
Spread 3/4 of the dough onto a greased half-size cookie sheet or bun pan (the kind with sides). If you don't have any of these, you need to go buy one or five or ten! You can never have too many. I like to slide my hand into a small sandwich baggie that I have sprayed with PAM. Use your "baggie hand" to push the dough evenly onto the cookie sheet and into the corners. Once your dough is spread evenly, top it with the cherry pie filling. Drop the remaining batter "hit and miss" over the pie filling, one teaspoon at a time. This will give the bars a beautiful cobblestone appearance. Bake for 25-35 minutes. (Make sure the dough is cooked in the middle of the pan. The edges will be browned.) Remove from the oven and drizzle with the glaze. Let cool. Cut into squares.
Wednesday, February 1, 2012
Reese's Peanut Butter Cup Cookies
You know what they say..."I never met a cookie I didn't like."
That is pretty much my mantra. I would be hard pressed to come up with a cookie that I just couldn't eat. Particularly if it is homemade. Maybe those bacon cookies that are all the rage. I just don't think I can go there.
Anyway, have you tried these little beauties yet? These are a stroke of Reese's genius! I bought a bag the other day and decided that it was high time to bake something with them (before I just ate the entire bag by the handful). But, what to make? That was the question. Trifle would be yummy. Some kind of pie or cheesecake or bar. Yes, that would be delicious. But, I settled on simple.
I whipped up a batch of my favorite peanut butter cookie dough (from my trusty Pillsbury cookbook). Then I just dumped that entire bag of candy into the mixing bowl and scooped it into balls. Well, not really. I had to save out a few in case of a late night chocolate emergency! I baked a few sheets for now and I saved a bunch for later. These would be delicious as a deep dish cookie served with a generous scoop of ice cream!
I was worried that the peanut butter cups would melt too fast and make a gooey mess. But they didn't. They were perfect! Pure peanut butter heaven I tell you.
You'll definitely want to have some milk on hand.
(I was in no way compensated for this post. These are just my humble cookie opinions.)
Friday, January 27, 2012
[Happy Birthday] Deep Dish Cookies
I have the most amazing friends! We formed a friendship years and years ago when our children were tiny. We had all just moved into a brand new neighborhood. It was a magical time. It has been so fun to all grow up together. Some of these dear friends have moved away. But thankfully not very far. We still get together often and it is always so good for my soul! We laugh and laugh and laugh. And sometimes we cry. I was thinking of all the things we have been through together and all the support that we have given each other. We have been there for each other in childbirth and adoption and in the untimely death of loved ones. We have nursed each other through illness and surgery and life-threatening car accidents. We have hosted parties and put on neighborhood plays. I have taught their children and they have taught mine. We have survived summer camps and vacations with each other. We have cooked and crafted together. We have witnessed each others children graduate from elementary school and high school. Our kids have rallied around each other. They have played little league together and dated each other. We've watched some of these little ones move onto college and get married. Now they are starting to have children of their own. I can't even begin to tell you how important these women are to me. They are truly fantastic!!
Today we had lunch. It was delicious!! We get together once a month for a luncheon. And we celebrate birthdays while we are at it. January happens to be a BIG birthday month. I needed a gift and fast. Actually I needed three gifts.
Are you a fan of the deep dish cookie?? If you haven't tried them, you are truly missing out. It's basically a cookie that is baked in it's own little dish and served hot out of the oven with ice cream. I don't know what it is, but there is something different and magical about that little dish. It transforms that humble little lump of cookie dough into so much more. And yet it is doesn't require anything extraordinary. It is simplicity at its very best!
I decided to give my dear friends all of the essentials to make their own deep dish cookies at home. This is what you will need to do:
Step One: Purchase some oven safe individual bowls. I found these custard dishes at WalMart. You can get four bowls for about $5. Ramekins would work really well too.
Step Two: Make your favorite cookie recipe. Any recipe will do. My family has experimented with snickerdoodle, chocolate chip, double chocolate, peanut butter, and oatmeal in the past. All of them are equally amazing. When I am making cookie dough at home, I usually use my cookie scoop and flash freeze the cookies in little balls on a cookie sheet in the freezer. Then I bag them and have them on hand whenever I need them. For my friends, I packaged my favorite homemade chocolate chip cookie dough in a carton container and tied it up with a bow. (My five year old just learned to tie her shoes. She wanted me to be sure to tell you that she tied all of the bows. Didn't she do a great job?)
Step Three: Write up the directions on how to bake your cookies. If you preheat the bowls on a cookie sheet at the same time you are preheating your oven, the cookies won't take as long to bake. When your oven is warm, just drop a scoop of cookie dough into each preheated bowl and bake as usual. My chocolate chip cookies need to bake for about 12 minutes at 350 degrees.
Step Four: Write a little birthday note.
Step Five: If you want to be an extra-miler you could buy a container of ice cream to go with your cookies. (Sorry ladies...I didn't think of that until just now)
Step Six: Package everything up and deliver it with a big hug!
Today we had lunch. It was delicious!! We get together once a month for a luncheon. And we celebrate birthdays while we are at it. January happens to be a BIG birthday month. I needed a gift and fast. Actually I needed three gifts.
Are you a fan of the deep dish cookie?? If you haven't tried them, you are truly missing out. It's basically a cookie that is baked in it's own little dish and served hot out of the oven with ice cream. I don't know what it is, but there is something different and magical about that little dish. It transforms that humble little lump of cookie dough into so much more. And yet it is doesn't require anything extraordinary. It is simplicity at its very best!
I decided to give my dear friends all of the essentials to make their own deep dish cookies at home. This is what you will need to do:
Step One: Purchase some oven safe individual bowls. I found these custard dishes at WalMart. You can get four bowls for about $5. Ramekins would work really well too.
Step Two: Make your favorite cookie recipe. Any recipe will do. My family has experimented with snickerdoodle, chocolate chip, double chocolate, peanut butter, and oatmeal in the past. All of them are equally amazing. When I am making cookie dough at home, I usually use my cookie scoop and flash freeze the cookies in little balls on a cookie sheet in the freezer. Then I bag them and have them on hand whenever I need them. For my friends, I packaged my favorite homemade chocolate chip cookie dough in a carton container and tied it up with a bow. (My five year old just learned to tie her shoes. She wanted me to be sure to tell you that she tied all of the bows. Didn't she do a great job?)
Step Three: Write up the directions on how to bake your cookies. If you preheat the bowls on a cookie sheet at the same time you are preheating your oven, the cookies won't take as long to bake. When your oven is warm, just drop a scoop of cookie dough into each preheated bowl and bake as usual. My chocolate chip cookies need to bake for about 12 minutes at 350 degrees.
Step Four: Write a little birthday note.
Step Five: If you want to be an extra-miler you could buy a container of ice cream to go with your cookies. (Sorry ladies...I didn't think of that until just now)
Step Six: Package everything up and deliver it with a big hug!
Monday, December 5, 2011
Double Stuffed Caramel Cookie Pops
Are you hosting a cookie exchange? Are you attending a cookie exchange? This is the cookie for you!
It's yummy and it's beautiful. And just between you and me...it's super easy.
I am not sure where this recipe originated. A friend of mine brought it to a cookie exchange a few years back. She walked away with the grand prize. How's that for a sales pitch?
You will need four ingredients:
vanilla wafers
caramel
chocolate discs
sprinkles
This isn't one of those precise recipes. You pretty much just wing it.
As for the caramel ...pretty much anything goes. Do you like to make your own? Fabulous! Do it. Do it right now. Do you have candy thermometer-a-phobia? (Yes, I am sure that's a real word!) No problem. I have a suggestion for you. It's called Peter's Caramel. It comes in a large golden brick of deliciousness. Just cut off what you need, and put it in a cup or bowl. Melt it slowly in the microwave (50% power for 30 second intervals until it's melted and smooth) or in a double boiler. I usually find Peter's Caramel at my local candy supply store. It can also be found online. Another less delicious but equally viable option is to use Kraft Caramels and melt according to package directions. Place a dollop of melted caramel on the flat side of each vanilla wafer. I used a regular spoon (the kind you eat your cereal with in the morning) and filled it about half-way. Then I took another spoon to scrape it onto the cookie. Let the caramel set for a minute.
Take two caramel laden cookies. Place a lollipop stick in the middle and carefully squish the cookies together. The double caramel makes all the difference. Really. I'm not going to lie to you. If you skimp on the caramel you will be sorry.
Now slowly melt your chocolate discs in a small bowl or cup in the microwave. Again, use 50% power for thirty second intervals. Stir after each. Once your chocolate is smooth and lump free, you are ready to dip. Carefully dip each cookie pop into the chocolate. Tap off the excess. Place on a parchment lined cookie sheet. Decorate with sprinkles if desired. Place in the freezer for a few minutes to allow the chocolate to harden. You can also stripe with contrasting chocolate colors (like white or red or green) or decorate with royal icing.
You can alter this recipe to make as many or as few as you like. I made twenty-five pops with 1 cup of caramel and a couple of handfuls of chocolate discs.
Package them up and deliver them to all of your loveliest friends.
Update: I have improved upon these a bit. Check here if you want to know how.
Subscribe to:
Posts (Atom)