Showing posts with label bar cookies. Show all posts

Friday, March 1, 2013

[St. Patrick's Day] It's Your Lucky Day


What says "lucky" more than an anonymous treat left on your doorstep?  I can't think of a darn thing.  Especially if that treat is packaged up all cute and lucky-like.  And even more especially if it that happy-go-lucky package contains fudge mint brownies.  They're frosted with green buttercream and drizzled with chocolate.  They're delicious!


It just doesn't get any better than this people.

You will need to make some brownies.  Try this recipe.  It's the only one you will ever need.  It will make enough batter for two of these cute little pans.  


I found these handy little aluminum pans at the WalMarts.  They are called "Rectangle Pans with Board Lids."  They come three to a package and cost pennies more than a dollar.    Lucky?  I think yes.

Bake your brownies and allow them to cool.  Then frost them generously with mint buttercream frosting.  Drizzle with melted chocolate to take them right over the edge.  After all...these are lucky brownies!

The thing I loved best about these aluminum pans, is their cardboard tops.  A blank canvas just screaming to be jazzed up a bit.  Don't you think?

Go ahead and put the plain old boring cardboard topper on your pan.  But don't crimp the edges closed just yet.  

Print out one of these little guys and trim it to size.  My treat box measures about 8" x 6". You could trace the original one around your print-out to make sure you get it right.

Place our lucky topper on top of that old boring one and crimp the edges closed.  Now wrap some cute green baker's twine around and around and finish it off with a lucky tag.

We just can't wait to doorbell ditch these lucky treats on some unsuspecting neighbor.  Won't you join us? 

The best thing about this little project?  It makes two!  You can give one away and keep one for yourself.  Now that is lucky!


I'm linking up with:

Saturday, February 18, 2012

Cherry Cups

In honor of President's Day and that infamous cherry tree, I offer you "cherry cups"!  These are probably one of my all time favorite treats.  I love them.  When I make them, I have the tendency to want to eat them all.  This recipe originated with one of my mother's old friends.  It is worn and stained and barely keeping it together.  You know that means it has to be good!


So, let's get started.  Preheat your oven to 350 degrees.

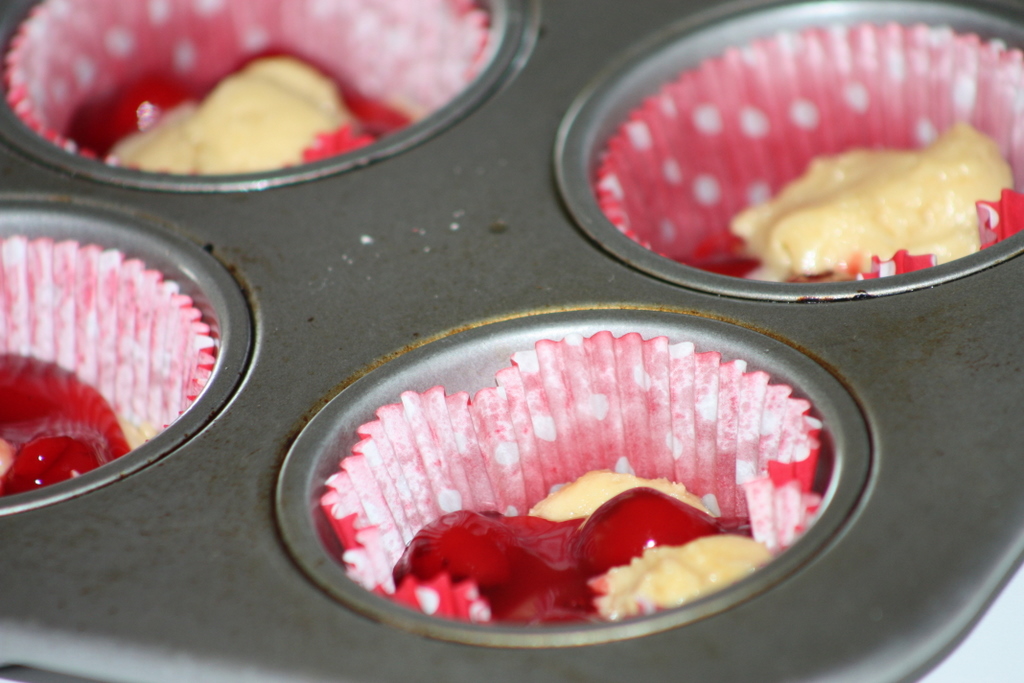
Put the sugar and the butter in your mixing bowl.  Cream well.  Add the eggs one at a time and beat well after each addition.  Add the vanilla.  Mix.  Add the remaining dry ingredients and blend to incorporate.  This is the yummiest dough EVER.  I dare you not to eat a little.  (I obviously don't subscribe to that whole raw egg thing)  Line a muffin pan with muffin papers.  Lightly spritz your muffin papers with PAM.  (This will enable you to remove the papers more easily when it comes time to eat them!)  Drop a scant tablespoon of dough into each muffin cup.  Flatten slightly with your fingers or a small greased cup. 

Open a can of your favorite cherry pie filling.  Add 1 teaspoon of almond extract to the filling in the can.  Stir.  Spoon 1-2 cherries (and the accompanying glaze) into each muffin cup.  Top with another 1-2 teaspoons of dough.


Bake for 20-25 minutes until golden brown and cooked through.

While your cherry cups are baking, you will want to whip up a powdered sugar glaze.  In a small bowl, mix the melted butter, vanilla, milk, and powdered sugar until it is smooth and free of lumps.

When your cherry cups are baked to perfection, remove the pan from the oven and carefully remove each cup from the pan.  I like to use a fork to gently lift them out.  Drizzle with  the glaze while they are still warm.  Let them cool. Try not to eat the whole lot of them!


*****
The original recipe that I received from my Mom called for making the dough into cherry bars.  Which is a great option.  It's fast and easy and you can cut them into squares after they are baked and iced.  The cherry cups are a little more portable and not as fragile.  You may want to eat the bars with a fork.  If you want to make this recipe into bars, just follow the instructions below:

Spread 3/4 of the dough onto a greased half-size cookie sheet or bun pan (the kind with sides).  If you don't have any of these, you need to go buy one or five or ten!  You can never have too many.  I like to slide my hand into a small sandwich baggie that I have sprayed with PAM.  Use your "baggie hand" to push the dough evenly onto the cookie sheet and into the corners.  Once your dough is spread evenly, top it with the cherry pie filling.  Drop the remaining batter "hit and miss" over the pie filling, one teaspoon at a time.  This will give the bars a beautiful cobblestone appearance.  Bake for 25-35 minutes.  (Make sure the dough is cooked in the middle of the pan.  The edges will be browned.)  Remove from the oven and drizzle with the glaze.  Let cool.  Cut into squares. 


Related Posts Plugin for WordPress, Blogger...