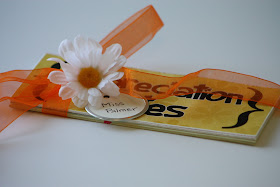
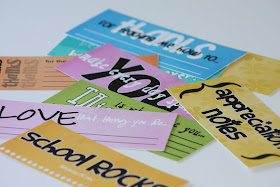
Personal notes. A whole pack of them. Written by you and your kids. Or a classroom of kids. Just fill in the blanks or write a personal note right on top of the graphic or on the back. Whatever.
What better way to say thanks to a special teacher? The cuteness lies in the packaging. Have you ever made your own notepad? You are going to love this. This is a skill that every crafter needs to have in their bag of tricks. The options are endless.
For our intents and purposes, you will need the following:
padding compound
binder clips
piece of heavy card stock
small paint brush
cover pages and thank you notes-click here
Step One: Print out the notes. Just click on the link above and print away. There should be three pages worth. I printed mine on card stock.
Step Two: Cut the notes out with a paper cutter.
Step Three: Stack your notes together. Make sure they are all facing the right direction. Put the cover page on top on the back cover--well, on the back. Make sure it faces out.
Step Four: You are going to want to sandwich your notepad with a heavier card stock to prevent drips down the front or the back. I used the back of an old steno pad. I just cut it about the same size as my note cards. It doesn't matter if it looks pretty. You are going to discard these two pieces before we are done.
Step Five: Tap your note cards (and ugly card stock) on the tabletop so the tops and sides are all aligned. Hold them in place with binder clips.
Step Six: You want quite a bit of pressure on your paper, so the bonding compound doesn't drip down in between. I decided to use some thin pieces of wood to even out the pressure. You will also want to clamp it down tight with some heavy binder clips. My honey insisted on using the mega clamps from the wood shop. If you've got em--use em. If not, I'm sure binder clips will work just fine. If you are worried about it, practice with some scratch notepads.
Step Seven: Open your padding compound. You can buy it here. We inherited this vintage jar from my husbands office. It's gotta be twenty years old. I was a little nervous that it would be rock solid when I opened the jar. But, after a few quick stirs, it was perfect. I think this jar will last us about a hundred years. You only need a tiny bit.
Step Eight: Take a small paint brush (nothing fancy--I used my daughters watercolor brush from her crayola box). Brush the compound across the top of your notepad. Let it dry for thirty minutes.
Step Nine: Remove the clamps and remove the ugly cardboard from the front and back.
Step Ten: Have your kids fill in their memories and write little notes. Admire everyone's work!
And now for a little surprise ending...Bank Notes!
If you want to take this little gift from great to WOW, add a few bank notes to the back of your notepad. I chose to use one dollar bills. You want them as crisp and clean as possible. Don't be afraid to iron them if you need to. It doesn't have to be much. Five dollars? Ten? Twenty? I made the note cards to be the exact same size as a dollar bill. So, before you embark on step four, throw a few dollar bills into your stack. You could intersperse them or put them all at the end for a little surprise. I don't know of any teacher that couldn't use a little extra cash in their rainy day fund. They could put it towards their classroom supplies, or happy hour at Sonic, or go to their favorite sandwich place for lunch.
Appreciation. That's what we're talking about!
Need another teacher appreciation gift idea? Click here!
I'm linking up with:
.


I love personal gifts. This is such a great gift. Thanks for linking to the Point of View link party.
ReplyDeleteThanks Leanne! I so appreciate a good linky party!
ReplyDeleteStopping by from Triple T Mum. Thanks for linking up to the Kids Coop. I have chosen this post as feature post of the week for my Kids Coop Showcase. When you get a chance, stop by and pick up your Featured at... button.
ReplyDeleteAmie, I'm flattered! Thank you so much!
ReplyDeleteWhat a great idea! I love that it is personalized. I think I may have to find some of that padding compound stuff. The fact that it is pink only makes it better :) Thanks for linking up to Point of View! I am going to feature your project. Feel free to stop by and grab a featured button :)
ReplyDeleteI happened to see some padding compound at the local office supply store. You might try there! Thanks for stopping by!
Delete